Appetizers
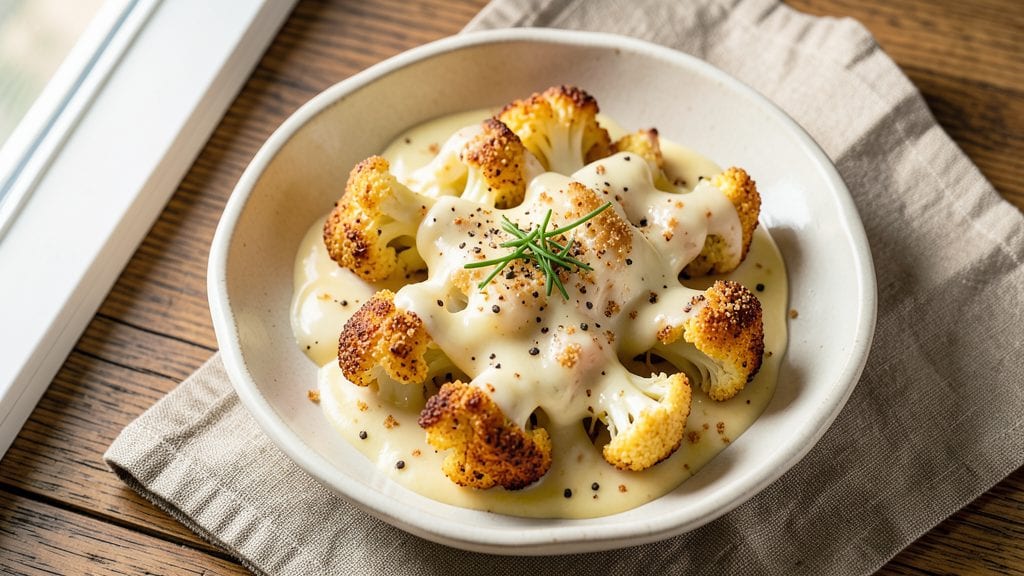
A basic cauliflower cheese recipe transforms humble ingredients into a dish that’s crispy on top, creamy inside, and impossible to resist.
This vegetarian classic delivers restaurant-quality comfort in a single baking dish, with a golden breadcrumb crust that shatters at every bite while the cheese sauce beneath melts into pull-apart perfection.
I’ve perfected this method over years of testing—no shortcuts, just precise technique to ensure the cauliflower stays tender and the cheese never separates.
The secret lies in the sauce: a rich blend of sharp cheddar, Gruyère, and a touch of cream that creates a velvety texture without being overly heavy. A proper breadcrumb topping, toasted to a deep golden brown, adds that satisfying crunch that makes this dish unforgettable.
What makes it truly foolproof is the layering—steamed cauliflower first, then sauce, then breadcrumbs—so every bite delivers that perfect contrast of textures and flavors.
By the time it emerges from the oven, you’ll have a dish that’s creamy, cheesy, and crispy all at once—ideal for a hearty appetizer, light lunch, or even a side that steals the show.
The aroma alone will have everyone gathering around the table, and the first forkful proves why this recipe has been a comfort food staple for generations. Ready to master it?
This recipe works beautifully as a standalone dish or paired with a simple green salad. For extra indulgence, add a sprinkle of smoked paprika to the breadcrumbs or swap in vegan cheese for a plant-based version.
The possibilities are endless, but the foundation remains the same: crispy, melty, and absolutely irresistible.
Ingredients for basic cauliflower cheese
Twelve simple ingredients create a crispy-topped, melty cauliflower cheese that's restaurant-quality at home.
| Ingredient | Amount | Notes |
|---|---|---|
| Fresh Cauliflower 🥬 | 1 ½ lb | Cut into florets, no need to peel |
| Sharp Cheddar Cheese 🧀 | 2 cups | Shredded, aged 6+ months |
| Gruyère Cheese 🧀 | 1 cup | Shredded, for nutty depth |
| Heavy Cream 🥛 | ½ cup | Full-fat for richness |
| All-Purpose Flour 🌾 | ¼ cup | For thickening sauce |
| Panko Breadcrumbs 🍞 | 1 cup | Toasted for extra crunch |
| Unsalted Butter 🧈 | 2 tbsp | Melted for topping |
| Garlic Cloves 🧄 | 2 cloves | Minced for flavor base |
| Yellow Onion 🧅 | 1 whole | Diced, yellow or white |
| Salt 🧂 | 1 ½ tsp | Kosher or sea salt |
| Ground Black Pepper 🌶️ | ½ tsp | Freshly ground preferred |
| Nutmeg 🌿 | ¼ tsp | Freshly grated for warmth |
| Milk 🥛 | ¼ cup | Whole milk for creaminess |
The cheeses are non-negotiable here. Sharp cheddar brings the tang, while Gruyère adds that nutty depth—skip the pre-shredded stuff (it's coated and won't melt right). Grab a block of each from Whole Foods or your local cheese counter if possible. For the cauliflower, fresh is best, but frozen florets work in a pinch (thaw and pat completely dry). The breadcrumbs? Panko gives you that perfect crunch—don't use regular breadcrumbs. Toast them in a dry pan for 2-3 minutes before using to amp up the flavor.
No sharp cheddar? Extra-sharp white cheddar works, or swap half for Parmesan for a different texture. Running out of Gruyère? Comté or Emmental are solid substitutes. The heavy cream can be swapped for half-and-half if you're watching calories, but trust me on the full-fat version. For the garlic, roasted garlic adds sweetness if you prefer. The nutmeg is optional but worth it—it's what makes this dish taste like a proper British classic. And if you're making this ahead, pre-shred the cheeses to save time later.
This reheats beautifully—just cover with foil and warm at 350°F for 10-15 minutes. The leftovers keep for 4-5 days in the fridge, though honestly, it's hard to resist eating it all in one sitting. For freezing, portion into individual servings before baking—reheat straight from frozen with an extra 5 minutes covered. The breadcrumb topping gets soggy if stored uncovered, so always keep it sealed. Double the recipe? It's worth it—this disappears fast at gatherings.
Why You'll Love This Recipe
- One-Pot Magic: I swear by this recipe when I’m too tired to wash extra dishes—just roast the cauliflower, make the sauce in the same pan, and call it a win. That flour-thickened cream sauce? Sticks like glue, no strainers or extra pots needed.
- Cheese Love Bomb: Sharp cheddar and Gruyère together? It’s like a hug for your taste buds—nutty, sharp, and just salty enough to make you reach for seconds. The heavy cream ties it all into that velvety, melt-in-your-mouth sauce.
- Leftover Hero: This dish actually improves the next day. The sauce gets richer, the cauliflower soaks up extra flavor, and it reheats like a dream—perfect for lunchboxes or a lazy Sunday. (Yes, even on a Tuesday night.)
- Budget Comfort Food: Cauliflower stretches like crazy, so I can feed my family for less than takeout. The cheese sauce is rich but not wasteful, and I’ll often swap in whatever sharp cheese I have on hand. Filling, flavorful, and kind to my wallet.
Step-by-step instructions for crispy cauliflower cheese
Here's how to achieve that perfect golden crust and creamy, melty center every time.
Prepare the Cauliflower and Cheese Mixture
Preheat your oven to 400°F. Cut the 1.5 lb fresh cauliflower into even florets, discarding any tough stems. In a large bowl, combine the cauliflower with the 2 cups shredded sharp cheddar cheese, 1 cup shredded gruyère cheese, 1.5 tsp salt, 0.5 tsp ground black pepper, and 0.25 tsp nutmeg. Toss gently until the cheese evenly coats the cauliflower florets.
This step ensures the cheese adheres properly and melts uniformly during baking. The nutmeg adds subtle warmth that complements the sharp cheddar perfectly. Don't skip the tossing—uneven coating leads to dry spots in your finished dish.
Create the Crispy Topping Layer
In a separate bowl, mix the 0.25 cup all-purpose flour, 1 cup panko breadcrumbs, and 0.25 cup milk until combined. Melt the 2 tbsp unsalted butter in a small saucepan over low heat, then stir in the 0.5 cup heavy cream until smooth. Remove from heat and let cool slightly.
This topping creates the signature crispy crust while keeping the interior creamy. The flour and panko provide texture, while the butter and cream add richness. The milk helps bind everything together for a cohesive layer that won't crumble when baked.
Assemble and Bake for Perfect Texture
Transfer the cauliflower-cheese mixture to a greased 9x13-inch baking dish. Spread it evenly in the dish, then pour the cooled butter-cream mixture evenly over the top. Sprinkle the flour-panko mixture evenly over the butter layer, pressing down gently to ensure good contact.
Bake for 25-30 minutes until the top is deep golden brown and the cheese is fully melted and bubbly. The edges should be crispy while the center remains tender. If the top browns too quickly, tent loosely with foil to prevent burning while allowing the cheese to melt.
Sauté the Aromatics for Serving
While the cauliflower bakes, heat 1 tbsp unsalted butter in a skillet over medium heat. Add the 1 whole yellow onion and 2 cloves garlic cloves (minced), cooking for 5-6 minutes until the onion is soft and translucent. Season with a pinch of salt and pepper.
This aromatic base adds depth to your dish. The caramelized onions and garlic provide a sweet contrast to the sharp cheeses. Keep the heat medium to develop flavor without burning the garlic. Serve the cauliflower immediately with the onion-garlic mixture spooned over the top.
Rest and Serve with Confidence
Let the cauliflower cheese rest for 5 minutes before serving. This allows the cheese to set slightly and makes it easier to cut clean slices. The crispy topping should hold its shape while the interior remains creamy and pull-apart tender.
Serve immediately with a side of steamed green beans or a simple salad. The contrast between the crispy top and melty cheese creates the perfect texture combination. Each bite should deliver that satisfying pull-apart magic while maintaining the crispy crust you worked so hard to achieve.
Pro Tips For Making Basic Cauliflower Cheese
- Cut Small, Even Bites: Break the cauliflower into 1-inch florets—no bigger, no smaller. I learned this the hard way: larger chunks stay undercooked, while tiny pieces turn to mush. A sharp knife and a steady hand make this faster than you’d think.
- Melt Cheese Slowly: Warm the heavy cream and shredded cheese over medium-low heat, stirring constantly—no rushing. Gruyère melts faster than cheddar, so if you see lumps, pull the pan off the heat for 10 seconds. This isn’t the prettiest method, but it’s the tastiest.
- Skip the Overmixing: Once the roux is formed, whisk in the cream just until smooth—no need to cook it into a thick paste. Overmixing turns the sauce gummy, and you’ll end up with a gluey mess instead of a silky cheese sauce. Trust the process.
- Roast Cauliflower First: Toss florets in olive oil, salt, and pepper, then roast at 400°F (200°C) for 15 minutes before baking under cheese. This adds texture and flavor without extra effort—your future self will thank you. (Yes, even if you’re impatient like me.)
Best sauces and condiments for this basic cauliflower cheese
Creamy Cheese Sauce
The star of this dish is the velvety cheese sauce, and I’ve perfected it with a simple roux technique. Melt 2 tbsp unsalted butter in a saucepan over medium heat, then whisk in ¼ cup all-purpose flour to form a smooth paste.
Gradually add ½ cup heavy cream and ¼ cup whole milk while whisking constantly to avoid lumps. Bring to a gentle simmer for 3-4 minutes until thickened, then remove from heat and stir in the 2 cups sharp cheddar and 1 cup Gruyère until fully melted.
Season with ½ tsp nutmeg, ½ tsp salt, and ¼ tsp black pepper—this is where the magic happens. 🧀
Garlic-Herb Aioli
For a bright, tangy contrast, whip up a quick garlic-herb aioli by blending ½ cup mayonnaise, 1 tbsp lemon juice, 1 minced garlic clove, 1 tbsp chopped fresh chives, and a pinch of salt.
Drizzle this over individual portions before serving to cut through the richness. I love adding a splash of hot sauce (like Tabasco) for a spicy kick. This works especially well with the crispy cauliflower topping. 🌿
Crispy Sausage Gravy
For a heartier twist, brown ½ lb smoked sausage (like Kielbasa) in a skillet until crispy, then remove and set aside. In the same pan, sauté 1 diced onion and 2 minced garlic cloves until soft.
Deglaze with ½ cup beef broth, then whisk in 2 tbsp flour to thicken. Stir in the reserved sausage and a splash of milk to create a luscious gravy. Pour over individual servings for a comforting, meaty addition. 🍖
Spicy Sriracha Cream
Mix ¼ cup sour cream with 1 tbsp Sriracha and a pinch of smoked paprika for a creamy, spicy drizzle. This balances the richness of the cheese sauce beautifully.
I like to dollop it on top of the cauliflower cheese right before serving—it adds a tangy, fiery contrast that elevates the dish. For extra heat, add a dash of cayenne pepper. 🌶️
Herbed Butter Drizzle
Combine 2 tbsp softened butter with 1 tsp chopped fresh thyme, 1 tsp chopped parsley, and a pinch of salt. Melt this mixture in a small saucepan, then drizzle it over the baked cauliflower cheese just before serving.
The herbed butter adds an aromatic finish that ties all the flavors together. This is especially lovely if you’re serving it as a side dish. 🌿
Creamy Horseradish Sauce
For a bold, tangy kick, blend ¼ cup prepared horseradish cream (like Gourmet Garden) with 2 tbsp crème fraîche and a squeeze of lemon juice. This sauce adds a sharp, refreshing contrast to the creamy cheese.
I recommend serving it on the side for dipping or spooning over individual portions. It’s a game-changer for those who love a bit of bite. 💪
Nutrition facts
Frequently asked questions
Can I make this cauliflower cheese ahead of time?
Assemble the dish up to 24 hours ahead and refrigerate uncovered. Bake straight from the fridge, adding 5-10 minutes to the cooking time. For best results, cover with foil during the first 15 minutes to prevent over-browning while the cold dish heats through. The texture remains perfect when reheated this way.
What's the secret to a crispy topping?
The golden crust comes from three key steps: toasting the panko breadcrumbs in a dry pan for 2-3 minutes before using, pressing them gently into the butter layer, and baking at 400°F until deeply golden. Don't skip the flour in the topping—it helps create that satisfying crunch. A light spray of oil on the breadcrumbs before baking also enhances crispiness.
Can I substitute the cheeses?
Yes, but choose carefully. For the sharp cheddar, extra-sharp or white cheddar work well. Replace Gruyère with Comté or Emmental for similar nutty depth. For a vegan version, use a high-quality dairy-free cheese blend (like Violife) and add 1 tbsp nutritional yeast for umami. The sauce will be less rich, but still delicious when properly melted.
Why did my cauliflower cheese turn out dry?
Most likely, the cauliflower wasn't steamed enough before baking. For extra moisture, steam the florets for 5-6 minutes before mixing with cheese, or add 2 tbsp milk to the cheese sauce. Overbaking also causes dryness—remove the dish when the edges are golden but the center still jiggles slightly. The residual heat will finish melting the cheese while keeping it creamy.
How do I make this dish vegetarian-friendly?
This recipe is already vegetarian, but for extra assurance, verify your cheese and butter contain no animal rennet. For a plant-based version, use vegan cheese, coconut cream instead of heavy cream, and olive oil instead of butter. The breadcrumb topping can be made with vegan butter. The texture will be slightly different but still satisfying with proper technique.