
Soups & Stews
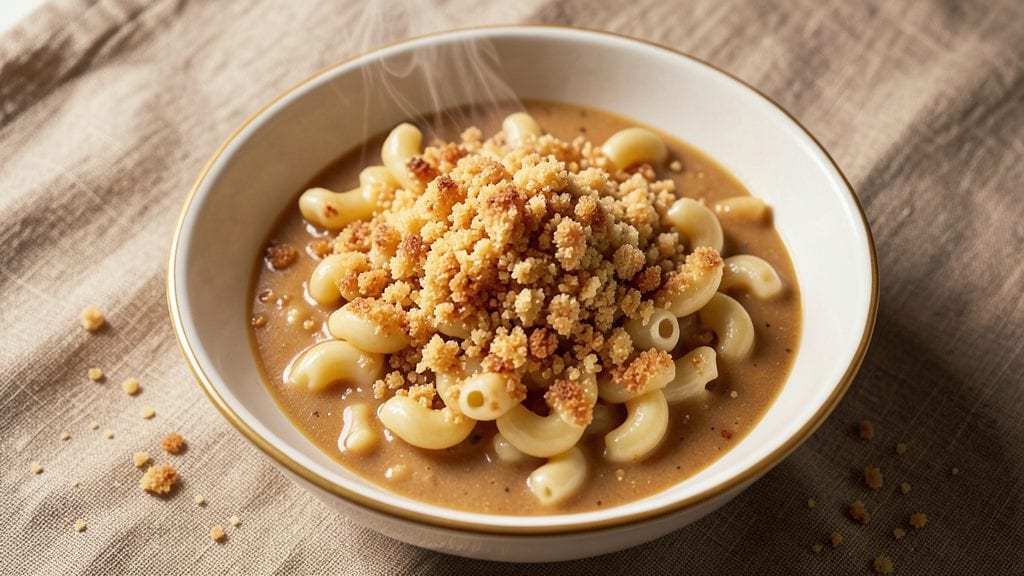
Transforming a can of Campbell's cheddar soup into this ultimate mac and cheese is the kind of kitchen magic that saves dinner when time is tight. The secret lies in balancing the soup's creamy richness with perfectly cooked pasta and a crispy breadcrumb topping—no fancy techniques required, just precise steps.
I first tried this after burning dinner one Tuesday night, and it became an instant family favorite.
This recipe delivers restaurant-quality results with minimal effort: boil your pasta, heat the soup until bubbly, then combine everything in one pot. The key is using a mix of sharp cheddar cheese and a buttery breadcrumb topping that adds texture without overpowering the creamy base.
Even my five-year-old can help with the stirring—though she usually sneaks bites before it's ready.
What you'll end up with is a creamy, cheesy masterpiece with a golden, crispy crust on top that's impossible to resist. The soup's natural thickness creates a velvety sauce that coats every noodle, while the breadcrumbs add just the right crunch.
This is comfort food at its finest—warm, satisfying, and ready in under 30 minutes.
For extra indulgence, add crispy bacon or a sprinkle of smoked paprika before baking. The possibilities are endless, but the foundation stays the same: simple ingredients, foolproof method, and guaranteed delicious results. Let's get cooking!
Ingredients for campbell's cheddar soup mac and cheese
Pantry staples plus a can of soup—this cheesy masterpiece comes together faster than takeout.
| Ingredient | Amount | Notes |
|---|---|---|
| Elbow Macaroni 🍝 | 12 oz | Uncooked, medium or short shape |
| Campbell's Creamy Cheddar Soup 🥫 | 2 cans | 10.5 oz each, not low-fat |
| Sharp White Cheddar Cheese 🧀 | 2 cups | Shredded, block preferred |
| Unsalted Butter 🧈 | ½ cup | Cold, cubed for topping |
| Panko Breadcrumbs 🍞 | ½ cup | Plain, not seasoned |
| All-Purpose Flour 🌾 | 2 tbsp | For thickening topping |
| Garlic Powder 🧄 | 1 tsp | For extra flavor punch |
| Smoked Paprika 🌶️ | ½ tsp | Optional for depth |
| Diamond Crystal Kosher Salt 🧂 | ½ tsp | For seasoning topping |
| Black Pepper 🌶️ | ¼ tsp | Freshly cracked preferred |
| Crispy Bacon 🥓 | ½ cup | Chopped, optional topping |
| Milk 🥛 | ¼ cup | Whole milk for creaminess |
The cheddar makes all the difference here. Sharp white cheddar from the deli section (not pre-shredded) gives that authentic tang—Kraft or Cabot work in a pinch. The soup? Stick with the full-fat version—low-fat just won't cut it for that velvety texture. For the pasta, elbow macaroni is classic, but cavatappi or shells add fun texture. I always grab the 12 oz box at Trader Joe's—it cooks perfectly every time. The milk is non-negotiable for that perfect creamy balance, so don't skip it just because you're using soup.
No sharp cheddar? Pepper jack at half the amount adds heat, or Gruyère for nutty depth. Short on breadcrumbs? Crushed cornflakes or Ritz crackers work in a bind. The smoked paprika is optional but worth it—Penzeys or Trader Joe's carry great options. For extra richness, stir in 2 tbsp sour cream with the milk. And if you're feeling fancy, swap the regular panko for Japanese panko—it gets extra crispy. The bacon? Store-bought crispy bacon saves time, but homemade always tastes better.
This reheats beautifully—just add a splash of milk to loosen it up. Keeps 4-5 days in the fridge, freezes for 3 months if you portion it right. I always make a double batch: one for dinner and one for lunches. The breadcrumb topping stays crispy if you reheat it covered with foil, then uncover for the last minute. Leftovers? Toss with a fried egg on top—trust me, it's a game-changer.
Why You'll Love This Recipe
- Pantry Magic: I swear by this recipe when the fridge is empty—just soup, pasta, cheese, and butter. That’s it. No fancy ingredients, no last-minute store runs.
- Creamy-Crisp Perfection: The Campbell’s soup handles the base work, but adding sharp white cheddar and a buttery panko topping? That crispy edge with the creamy center? It’s the kind of dish that disappears faster than my willpower on a bad day.
- Weeknight Hero: Between us, this is my go-to for busy nights when I need something hearty but still feels like a treat. Kids? Check. Spaghetti night? Nope—this wins every time.
- Leftovers That Don’t Suck: Honestly, the flavor only gets better the next day. I’ll make a double batch on Sunday, freeze half, and thank myself later when I’m reheating it for lunch. (Yes, even on a Tuesday.)
Step-by-step instructions for Campbell's cheddar soup mac and cheese
Here's how to transform simple pantry staples into a restaurant-quality dish with perfect texture balance.
Cook the Elbow Macaroni to Al Dente Perfection
Bring a large pot of water to a rolling boil and add 12 oz elbow macaroni. I like to use about 8 cups of water for proper expansion—enough to cover the pasta by at least 2 inches. Add 1 tablespoon salt to the boiling water (it should taste like the ocean) and stir to distribute the seasoning evenly.
Cook the pasta for 10-12 minutes until it's al dente—that means it should have a slight bite in the center when you taste it. Drain the pasta in a colander and set it aside, reserving 1 cup of pasta water in a measuring cup. This starchy liquid will be our secret weapon for creating an ultra-creamy sauce later. Don't rinse the pasta—those surface starches are essential for binding the cheese mixture.
Create the Creamy Cheese Sauce Foundation
In a large, deep skillet or Dutch oven, combine the 2 cans Campbell's Creamy Cheddar Soup and the 2 cups sharp white cheddar cheese. I use a heavy-bottomed pan to prevent scorching—the cheese can burn easily if the heat isn't controlled properly. Place the skillet over medium-low heat and stir continuously with a wooden spoon for 3-4 minutes until the cheese begins to melt completely and the mixture becomes smooth.
If the sauce starts to thicken too much before all the cheese melts, add 2-3 tablespoons of the reserved pasta water to loosen it. The goal is a velvety, pourable consistency that will coat every strand of pasta beautifully. Here's the thing—don't rush this step. You'll know it's ready when the mixture looks glossy and there are no more cheese clumps. Taste and adjust seasoning with a pinch of diamond crystal kosher salt and black pepper if needed.
Combine Pasta and Sauce for Maximum Creaminess
Add the drained elbow macaroni to the cheese sauce and stir vigorously for 2-3 minutes until every noodle is fully coated. The pasta will absorb some of the sauce initially, but don't worry—we're about to make this even richer. If the mixture looks too thick, add more of the reserved pasta water 1 tablespoon at a time until it reaches a creamy, spoonable consistency. The sauce should cling to the pasta without being watery.
This is where the magic happens. The starch from the pasta water acts as a natural thickener while keeping the sauce luxuriously smooth. I like to give it one final taste at this stage to ensure the seasoning is perfect—sometimes the Campbell's soup needs a little extra salt, and the sharp cheddar can use a touch more pepper. Adjust carefully, as we'll be adding more seasoning to the topping later.
Prepare the Ultimate Crispy Topping
In a medium bowl, combine the 0.5 cup unsalted butter (cold, cubed), 0.5 cup panko breadcrumbs, 2 tbsp all-purpose flour, 1 tsp garlic powder, 0.5 tsp smoked paprika, 0.5 tsp diamond crystal kosher salt, and 0.25 tsp black pepper. Use your fingers to work the butter into the breadcrumb mixture until it resembles coarse, wet sand with no dry spots remaining. This texture is crucial for achieving that perfect crispy crust.
For extra flavor, fold in the 0.5 cup crispy bacon. The smoky, salty bite will elevate every bite of this mac and cheese. If you're feeling fancy, you could even add a splash of 0.25 cup milk to the mixture—just enough to help the topping bind together better when it hits the oven. The mixture should hold together when pressed gently but still feel slightly crumbly.
Assemble and Bake to Golden Perfection
Preheat your oven to 375°F. Transfer the creamy mac and cheese to a 9x13-inch baking dish, spreading it out evenly. The dish should be about ¾ full—this gives us room for the topping without overflowing. Sprinkle the butter-breadcrumb mixture evenly over the top, pressing down gently with your fingers to ensure good contact with the cheese. This ensures maximum crispiness when it bakes.
Bake for 15-20 minutes until the topping is deep golden brown and the edges are bubbling. The cheese should be hot and melty underneath that crispy crust. Here's the trick—I like to broil for the last 1-2 minutes to get extra browning, but watch it closely to avoid burning. When it's done, let it rest for 5 minutes before serving. This resting period allows the topping to set slightly and makes it easier to slice.
Optional Enhancement for Next-Level Flavor
For that final touch of restaurant-quality perfection, I recommend adding a drizzle of extra sharp cheddar cheese or a sprinkle of freshly cracked black pepper right before serving. The contrast between the creamy interior and crispy topping is what makes this dish truly special. Serve immediately while the topping is still crisp and the cheese is melty—this mac and cheese doesn't wait!
Pro Tips For Making Campbell'S Cheddar Soup Mac And Cheese
- Cook pasta al dente first: The Campbell’s soup already has starch, so overcooked macaroni turns the whole dish gluey. Pull pasta out when it’s still slightly firm—you’ll finish cooking it in the oven later, and it’ll absorb the sauce perfectly without falling apart.
- Grate cheese fresh for texture: That pre-shredded sharp cheddar? It’s coated with anti-caking agents and turns clumpy when melted. Skip the bagged stuff—grate your own block just before baking. Yes, it’s a pain, but the result is silky, not grainy.
- Melt butter slow under pasta: Dump cold butter on hot pasta, and you’ll end up with a greasy mess. Warm the butter in a separate pan until it’s just melted but not browned, then stir it into the soup-pasta mix. The heat will distribute evenly, and you won’t get that weird buttery film on top.
- Bake uncovered first for crisp: Cover the casserole with foil for the first 15 minutes to melt the cheese, then uncover and broil for 2–3 minutes. This gives the panko topping a chance to get golden and crunchy instead of soggy—no one wants a sad, limp crust. Watch it like a hawk, though.
Pro cooking tips for campbell's cheddar soup mac and cheese
Pasta Water Secret
The single most important tip I learned from Mrs. Henderson was to never rinse your pasta after cooking. That starchy water is liquid gold for this recipe—it acts as a natural thickener and emulsifier.
Reserve 1 cup of pasta water in a measuring cup while draining, and use it 1 tablespoon at a time to adjust the sauce consistency. The starch helps the cheese melt more smoothly and creates that ultra-creamy texture we all love. 💫
Cheese Melting Mastery
Sharp cheddar is non-negotiable here, but how you melt it makes all the difference. Use a heavy-bottomed skillet (I swear by my Lodge cast iron) and keep the heat at medium-low.
Stir constantly with a wooden spoon—metal utensils can cause the cheese to break down and become grainy. If the mixture thickens too quickly, add that reserved pasta water gradually. The goal is a smooth, glossy sauce that looks like it belongs in a fine-dining restaurant. 🧀
Breadcrumb Topping Hacks
For that perfect crispy crust, the butter-breadcrumb mixture needs to be cold and well-incorporated. Cut ½ cup unsalted butter into small cubes and rub it between your fingers with the breadcrumbs until it resembles wet sand. This ensures even distribution and maximum crispiness.
Pro tip: Press the topping down firmly before baking—it should feel like you're packing snow. I also like to bake for 15 minutes, then broil for 1-2 minutes for extra browning. Watch it like a hawk to avoid burning! 🔥
Timing Tricks for Busy Nights
This recipe is designed for weeknight wins, but a few small tweaks can save even more time. Cook the pasta while the oven preheats—multitasking at its finest. For the topping, mix it while the mac and cheese bakes—it only needs 15-20 minutes.
And if you're really pressed, assemble the dish and refrigerate it overnight, then bake straight from the fridge. The cold cheese will melt more evenly, and you'll get that golden crust without worrying about timing. 💡
Cheese Substitutions
No sharp cheddar? No problem. Pepper jack adds heat, Gruyère brings nutty depth, or Monterey Jack keeps it mild. For a vegetarian twist, swap the bacon for crispy chickpeas or toasted pumpkin seeds.
The key is using 2 cups total of cheese—just adjust the flavor profile to your taste. I once used half cheddar and half Gouda for a caramelized sweetness that my daughter loved. Experiment fearlessly! 🧀
Make-Ahead Magic
This mac and cheese reheats beautifully—just add a splash of milk or pasta water to loosen it up. For freezer-friendly prep, assemble the dish (without baking), cover tightly with plastic wrap and foil, and freeze for up to 3 months.
Thaw overnight in the fridge, then bake as directed. The texture stays creamy, not dry, and the topping crisps up perfectly. I always make two batches—one for dinner and one for lunches. It's the ultimate meal prep hack for busy families. ❄️
Nutrition facts
Frequently asked questions
Why does this recipe use Campbell's cheddar soup instead of making a roux?
Campbell's cheddar soup provides instant creaminess and depth of flavor without needing to make a roux from scratch. The soup's natural thickness creates that perfect velvety texture while adding a subtle tang that balances the rich cheese. Plus, it cuts prep time dramatically—just open a can and heat!
Can I make this mac and cheese without baking it?
For a stovetop version, combine the cooked pasta, melted cheese sauce, and milk in a pot over low heat until everything is fully melted and creamy (5-7 minutes). Stir in the butter-breadcrumb mixture at the end for a crispy texture without baking. It won't be quite as golden, but it's still delicious and ready in 20 minutes.
What's the best way to prevent a soggy topping?
Press the breadcrumb mixture down firmly before baking to maximize contact with the cheese. Bake at 375°F for 15 minutes, then broil for 1-2 minutes to get extra browning. For extra insurance, sprinkle 1 tablespoon flour over the topping before baking—it absorbs moisture and keeps things crispy.
How do I adjust this recipe for a larger crowd?
Double the ingredients and use a 9x13-inch baking dish or two 8x8-inch dishes. For even baking, spread the mixture in a single layer—don't overfill. If making four servings, consider using a 10x15-inch jelly roll pan for easier serving. The key is maintaining the same thickness for even cooking.
What's the secret to getting that perfect creamy texture?
Reserve 1 cup pasta water and use it 1 tablespoon at a time to adjust the sauce consistency. The starch in the water acts as a natural thickener while keeping the sauce smooth. Also, melt the cheese over medium-low heat and stir constantly—this prevents graininess and ensures a silky finish.