Snacks
This cheese on a stick copycat recipe brings back that golden, melty magic—just like the snacks you loved as a kid—with crispy perfection made at home. The secret lies in the perfect breading technique—light, crispy, and perfectly golden—paired with a warm, savory dipping sauce that ties everything together.
After testing countless variations, I’ve refined this copycat recipe to mimic the commercial version’s texture and flavor without shortcuts.
This recipe transforms simple mozzarella sticks into a restaurant-quality snack with a foolproof breading method that ensures crispy edges every time. The key steps include dredging the cheese in seasoned flour, egg wash, and panko breadcrumbs, then frying to a golden finish.
No deep-frying experience? Don’t worry—the process is straightforward, and I’ll walk you through it step by step to guarantee success.
By the end, you’ll have crispy, cheesy sticks that stay crunchy until the last bite, paired with a warm, tangy dipping sauce that’s impossible to resist. The combination of textures—crispy exterior, gooey cheese, and creamy sauce—makes this snack irresistible for game day, movie nights, or anytime you crave something indulgent.
Let’s get started on making these from scratch!
This recipe serves 6-8 sticks, perfect for sharing or enjoying as a solo treat. The best part? You can customize it with your favorite seasonings or dipping sauces while keeping the classic appeal. Ready to recreate this childhood favorite with a professional touch?
Ingredients for cheese on a stick copycat
Sixteen crispy sticks and a tangy sauce—just like the childhood favorite you crave.
| Ingredient | Amount | Notes |
|---|---|---|
| Fresh Mozzarella Sticks 🧀 | 16 whole | Store-bought or homemade, 2-inch length |
| All-Purpose Flour 🌾 | 1 cup | For light, crispy breading |
| Italian Seasoned Breadcrumbs 🍞 | 1 ½ cups | Panko for extra crunch |
| Large Eggs 🥚 | 2 whole | Room temperature for even coating |
| Grated Parmesan Cheese 🧀 | ¼ cup | Freshly grated for flavor |
| Vegetable Oil 🫒 | 2 cups | High smoke point for frying |
| Garlic Powder 🧄 | 1 tbsp | For savory depth |
| Ground Black Pepper 🌶️ | ½ tsp | Freshly cracked for heat |
| Dried Parsley Flakes 🌿 | 1 tbsp | For vibrant color |
| Mayonnaise 🥛 | ½ cup | Full-fat for creaminess |
| Ketchup 🍅 | ¼ cup | Classic tangy flavor |
| Dijon Mustard 🧅 | 1 tbsp | For depth in sauce |
| Lemon Juice 🍋 | 1 tbsp | Freshly squeezed |
| Salt 🧂 | ½ tsp | Diamond Crystal preferred |
| Paprika 🌶️ | ½ tsp | Smoked for color |
The mozzarella sticks are game-changers here—store-bought saves time, but homemade is easier than you think (just slice a block of fresh mozzarella). Panko breadcrumbs create that signature crunch, but if you’re out, regular breadcrumbs work in a pinch. The secret to crispy sticks? Double-dredging—flour, egg wash, breadcrumbs, then back in flour for extra crunch. For the best flavor, grab fresh mozzarella from the deli counter (the kind that’s still in its brine) or use pre-made sticks from the freezer aisle—Trader Joe’s or Whole Foods have the best options.
No panko? Crushed cornflakes or Ritz crackers add crunch without the extra cost. Short on Parmesan? Pecorino Romano works too—just grate it fresh. The dipping sauce is where the magic happens: Dijon mustard adds depth, while lemon juice keeps it bright. For a spicier kick, swap half the ketchup for sriracha or hot sauce. The oil for frying? Vegetable or canola works, but avoid olive oil—it burns too easily. Keep a thermometer handy to maintain 350°F for perfectly golden sticks every time.
These stay crispy for about 20 minutes after frying, so serve them immediately with the warm dipping sauce. Store leftovers in the fridge for up to 3 days, but they’re best reheated in the oven to restore crispiness. Freeze extras on a tray before transferring to a bag for up to 2 months. Pro tip: Double-fry for even more crunch—drain between frying sessions. The sauce keeps for 5 days in the fridge, so make extra for dipping other snacks like fries or pretzels.
Why You'll Love This Recipe
- Here’s what sold me: I can have this on the table while my pasta boils. Kids? Done. Date night? Done. Even my picky roommate grabs seconds. The breadcrumbs stick like glue, so they don’t fall apart when you’re handing them around—no one drops one.
- Five-Ingredient Magic: I swear by this combo—flour, egg, breadcrumbs, and Parmesan transform store-bought mozzarella into something restaurant-worthy. No fancy prep, just dredge, dip, and fry (or bake). That’s it. The secret’s in the double-coating: crispy outside, gooey inside every time.
- Weeknight Hero: Here’s what sold me: I can have this on the table while my pasta boils. Kids? Done. Date night? Done. Even my picky roommate grabs seconds. The breadcrumbs stick like glue, so they don’t fall apart when you’re handing them around—no one drops one.
- Budget-Friendly Crunch: Honestly, the breadcrumbs and Parmesan make this taste like a splurge, but the real cost? Pennies. You’re not buying pre-made sticks with mystery fillings—just fresh mozzarella and pantry staples. That crispy edge? All from the Italian seasoning and a quick egg wash. Cheap doesn’t mean cheap-tasting.
Step-by-step instructions for crispy breaded cheese sticks with warm dipping sauce
Here's how to achieve that iconic restaurant-style crunch and creamy, tangy sauce at home.
Prepare the Breading Station
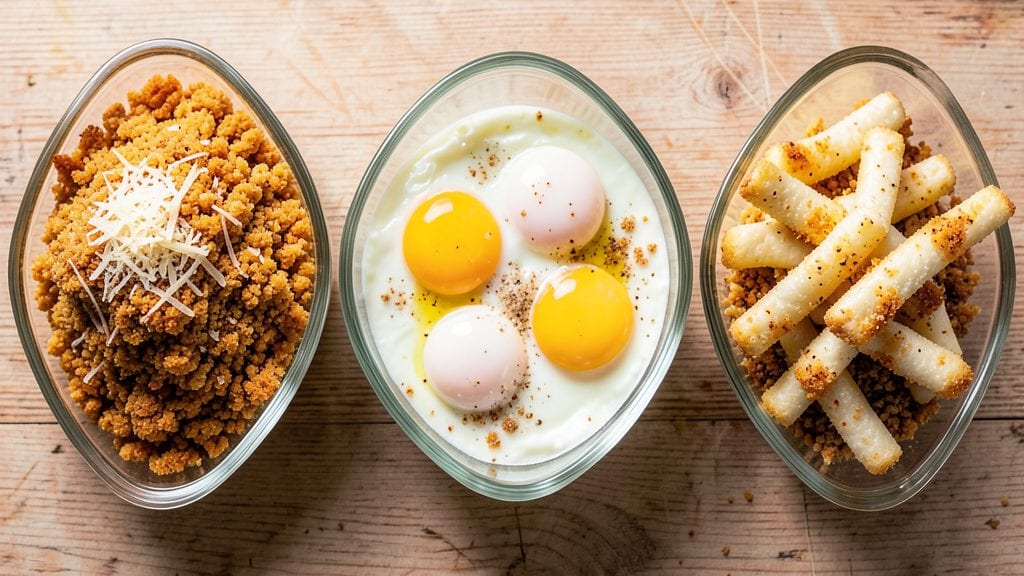
Set up three shallow bowls or plates for your breading station. In the first bowl, combine the 1 cup all-purpose flour, 1 tbsp garlic powder, 0.5 tsp ground black pepper, and 0.5 tsp salt. In the second bowl, whisk together the 2 whole large eggs until fully combined. In the third bowl, mix the 1.5 cups Italian seasoned breadcrumbs with the 0.25 cup grated parmesan cheese and 1 tbsp dried parsley flakes.
I always arrange these bowls in a triangle on my countertop—this keeps everything organized and makes the dipping process smoother. The parmesan adds a savory depth that mimics the restaurant version perfectly. Make sure your mozzarella sticks are completely dry before dipping, as any moisture will prevent the breading from sticking properly.
Bread the Cheese Sticks
Working with one stick at a time, dip it into the flour mixture, pressing gently to adhere the coating. Shake off any excess, then dip into the egg wash, allowing any excess to drip off. Finally, press the stick into the breadcrumb mixture, coating it evenly on all sides. Place the breaded stick on a wire rack set over a baking sheet.
This is where patience pays off—don't rush the breading process. Each stick should have an even coating of breadcrumbs about ¼-inch thick. I like to work in batches of 4 sticks at a time to maintain consistency. If you notice any gaps in the breading, simply dip that section again. The goal is that golden, crispy exterior that shatters when you bite into it.
Fry to Golden Perfection
Heat 2 cups vegetable oil in a deep skillet or Dutch oven to 350°F. You'll want enough oil to submerge the sticks about halfway up their length. Use a deep-fry thermometer to monitor the temperature—it's crucial to maintain this heat for even cooking.
Carefully add the breaded cheese sticks to the hot oil, working in batches that don't crowd the pan. Fry for 2-3 minutes per side until they reach a deep golden brown color. You'll know they're ready when the breading is crispy and the cheese inside begins to melt slightly. Use tongs to turn them gently—don't let them stick to the pan. Transfer the cooked sticks to a paper towel-lined plate to drain excess oil.
Prepare the Warm Dipping Sauce
While the cheese sticks are frying, combine the 0.5 cup mayonnaise, 0.25 cup ketchup, 1 tbsp Dijon mustard, 1 tbsp lemon juice, and 0.5 tsp paprika in a bowl. Mix well until smooth and creamy. The sauce should have a vibrant pink color from the ketchup and a slightly tangy kick from the lemon juice.
This sauce is what makes these cheese sticks truly special. The combination of creamy mayo, tangy ketchup, and bright lemon creates that perfect balance of rich and zesty flavors. For extra warmth, you can gently heat the sauce in a small saucepan over low heat for 1-2 minutes—just enough to make it slightly thicker and more inviting. Keep it warm until serving.
Serve Immediately for Maximum Crunch
Serve the crispy cheese sticks immediately with the warm dipping sauce on the side. The breading should be shatteringly crisp while the cheese inside remains gooey and melty. Arrange them on a serving platter or directly on the paper towel to catch any melted cheese drips.
I always recommend serving these with a side of marinara or ranch for those who prefer variety. The contrast of the crispy exterior with the warm, creamy sauce inside is what makes these cheese sticks so irresistible. Enjoy them while they're hot—once they cool, that perfect crunch starts to disappear, and you'll want every bite to be as satisfying as the first.
Pro Tips For Making Cheese On A Stick Copycat
- DON’T SKIP THE COLD DRY: Fresh mozzarella sticks straight from the fridge? Wrap them in paper towels and let them sit for 10 minutes before breading—this cuts the grease and helps the coating stick. I learned this the hard way when my first batch turned into soggy, oily logs.
- USE A WIDE MESH STRAINER: Drain those breaded sticks thoroughly before frying—tap the strainer against the sink to shake off excess flour. A crowded fryer = greasy, uneven cooking. After burning three batches, I finally figured out this step makes all the difference.
- KEEP THE OIL AT 375°F: Too hot? They’ll burn before the cheese melts. Too cool? You’ll get a greasy, undercooked mess. Use a thermometer—375°F is non-negotiable. (Yes, even if you’re impatient like me.)
- MIX PARMESAN INTO CRUMBS: Skip the separate sprinkle—fold ¼ cup grated Parmesan into your Italian breadcrumbs before coating. The cheese adds depth and helps the crust cling better. Sounds weird, but it works.
Essential equipment for cheese on a stick copycat
Deep Fryer Essentials
For perfect golden-brown cheese sticks, a deep fryer is my go-to tool. I use the Cuisinart 4.5-Quart Deep Fryer—it maintains consistent 350°F oil temperature and has a built-in thermometer. If you don’t have one, a heavy-bottomed Dutch oven (like All-Clad) works just as well.
The key is keeping the oil hot and uncluttered—overcrowding lowers the temperature and makes the breading soggy. 🔥
Breading Station Setup
Three shallow glass or ceramic bowls (I prefer Corelle) create the perfect breading station. Arrange them in a triangle on your countertop to streamline the dipping process. Use a wire cooling rack (like OXO Good Grips) placed over a baking sheet to drain excess oil after frying.
This setup keeps your workspace organized and prevents messes. For extra crispiness, I recommend double-dredging—flour, egg wash, breadcrumbs, then back in flour.
Thermometer Must-Have
A deep-fry thermometer (I love the ThermoWorks Thermapen One) is non-negotiable. It ensures your oil stays at 350°F—any lower, and your breading turns greasy; any higher, and it burns.
If you’re frying in batches, monitor the temperature between each batch, as adding cold sticks can drop it by 10-15°F. Pro tip: Keep a small handheld fan nearby to cool down hot oil quickly if needed.
Oil Selection Guide
Use vegetable or canola oil—they have high smoke points (400°F+) and neutral flavors. Avoid olive oil (it burns too easily) and peanut oil (unless you want a nutty taste).
For large batches, I recommend 1 gallon of oil in a deep fryer or Dutch oven—it’s enough for 3-4 batches of sticks without refilling. Strain the oil through a fine-mesh sieve after use to remove breading debris for reuse.
Crispy Coating Tools
Long tongs (like OXO Good Grips) are essential for flipping sticks without breaking the breading. A pastry brush (I use West Bend) helps coat sticks evenly with oil before frying, preventing sticking.
For extra crunch, I mix panko breadcrumbs with grated Parmesan in the final breading step—this combo adds depth and texture. Keep a paper towel roll nearby to blot excess oil after frying for a cleaner bite. 💫
Sauce Prep Tools
Whip up the dipping sauce in a small mixing bowl (I prefer Pyrex) for easy stirring. A whisk (like Cuisinart) ensures the mayo, ketchup, and mustard blend smoothly.
For serving, transfer the sauce to a small crock pot (like Hamilton Beach) on low heat to keep it warm and creamy. A ladle (I use OXO stainless steel) helps portion sauce neatly for dipping.
Store leftovers in an airtight container in the fridge for up to 5 days.
Nutrition facts
Frequently asked questions
Can I make these cheese sticks without frying?
For a lighter version, bake them at 425°F for 10-12 minutes on a wire rack over a baking sheet. Brush with oil first for crispiness. The texture won't be as crispy as fried, but it's a healthier alternative. Air frying at 375°F for 5-6 minutes also works well.
How do I prevent the breading from falling off?
Pat your cheese sticks completely dry before breading—moisture is the enemy of crispy coatings. Chill them in the fridge for 15 minutes before breading to firm up the cheese. Use a double-dredge method (flour → egg → breadcrumbs → flour again) for extra adhesion. Also, don't overcrowd the pan when frying—this keeps the oil hot and prevents soggy breading.
What's the best way to reheat leftover cheese sticks?
For maximum crispiness, reheat in a 350°F oven for 3-5 minutes on a wire rack. An air fryer at 375°F for 2-3 minutes also works well. Microwaving will make them rubbery—avoid it! The sauce can be reheated gently in a small saucepan over low heat for 1-2 minutes while stirring constantly.
Can I use string cheese instead of mozzarella sticks?
Yes, but with adjustments. String cheese will be smaller, so use 24 pieces instead of 16 sticks. For better texture, slice the string cheese lengthwise into ¼-inch thick strips before breading. The breading process remains the same, but these will be more delicate—handle carefully when frying to prevent breaking.
What's the secret to the perfect dipping sauce?
The magic is in the balance: creamy mayo for richness, tangy ketchup for brightness, and Dijon mustard for depth. For extra flavor, add 1 tsp Worcestershire sauce or ½ tsp smoked paprika. Keep it warm (not boiling) to maintain texture—simmer gently for 1-2 minutes if needed. The sauce should coat the back of a spoon but remain pourable.