
Snacks
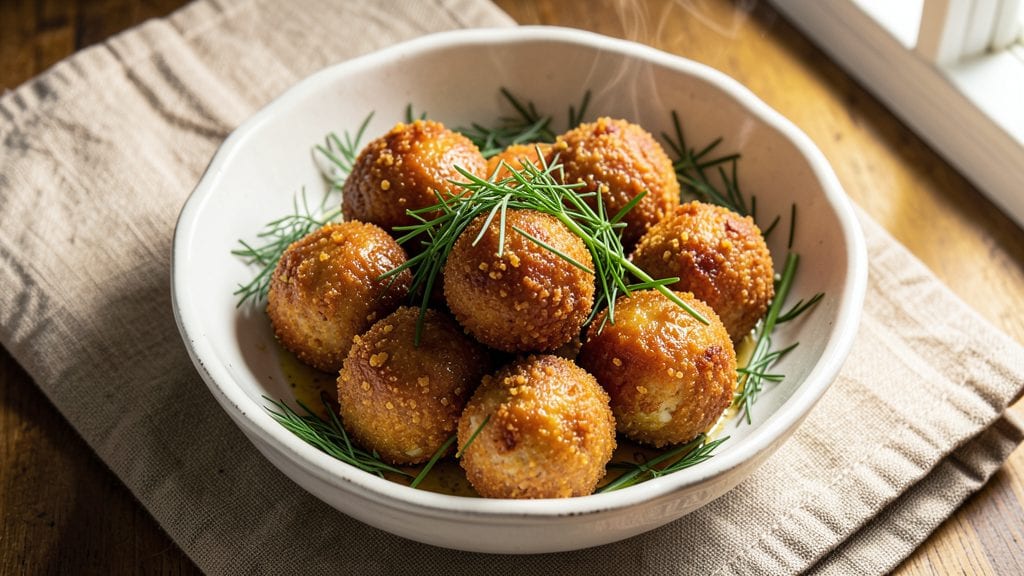
This fried goat cheese balls recipe promises golden, crispy bites with herbed, tangy centers that vanish in seconds. The secret lies in chilling the dough just enough to hold its shape while frying—too warm and they’ll crumble, too cold and they won’t brown properly. I’ve perfected this technique over countless batches, ensuring every bite has that satisfying crunch and creamy center.
This recipe transforms simple ingredients into a showstopping appetizer that’s ideal for parties or game day. The dough comes together in minutes with just goat cheese, flour, and herbs, then shapes into bite-sized balls before a quick fry in hot oil.
The key is maintaining 350°F throughout frying for even browning without overcooking the delicate cheese inside.
What you’ll end up with are crispy, golden balls that shatter slightly when bitten, releasing that herbed tang of goat cheese. Serve them warm with a side of honey mustard or marinara for dipping—each bite is a perfect mix of textures and flavors.
The best part? They’re ready in under 30 minutes, making them a foolproof crowd-pleaser.
For extra flair, sprinkle with flaky sea salt or fresh herbs before serving. These bite-sized treats are versatile enough for any occasion, from casual gatherings to elegant appetizer spreads. Let’s get started on creating your own batch of these irresistible fried goat cheese balls.
Ingredients for fried goat cheese balls
Golden, crispy bites start with just 12 simple ingredients—herbed goat cheese transforms into irresistible appetizers.
| Ingredient | Amount | Notes |
|---|---|---|
| Goat Cheese 🧀 | 8 oz | Soft, room temperature preferred |
| All-Purpose Flour 🌾 | 1 cup | Sifted for light texture |
| Fresh Chives 🌿 | ¼ cup | Finely chopped, mild flavor |
| Fresh Dill 🌿 | ¼ cup | Finely chopped, vibrant green |
| Large Egg 🥚 | 1 whole | Room temperature for binding |
| Vegetable Oil 🫒 | 2 cups | For frying, high smoke point |
| Flaky Sea Salt 🧂 | ½ tsp | For finishing, coarse grain |
| Black Pepper 🌶️ | ¼ tsp | Freshly ground, light hand |
| Lemon Zest 🍋 | 1 tsp | Brightens flavor profile |
| Panko Breadcrumbs 🍞 | ½ cup | For extra crunch coating |
| Butter 🧈 | 2 tbsp | Melted, for dipping |
| Honey 🍯 | 2 tbsp | For honey mustard dip |
The goat cheese is non-negotiable for that signature tang. Whole Foods or Trader Joe's carry excellent soft varieties—look for bright white color and minimal additives. If your cheese is too firm, let it sit at room temperature for 15 minutes before mixing. Fresh herbs make all the difference here: chives and dill should be vibrant green, not wilted. For extra flavor depth, add a pinch of lemon zest directly to the cheese mixture. The panko breadcrumbs add that perfect crunch—Japanese panko is ideal, but regular breadcrumbs work in a pinch.
No fresh chives or dill? Dried herbs at half the amount will work, though the texture won't be as light. Substitute goat cheese with soft ricotta or cream cheese if needed, but expect a slightly different texture. For the oil, vegetable or canola oil works best due to its high smoke point—avoid olive oil, which burns at frying temperatures. If you prefer a sweeter dip, swap the honey for maple syrup. The melted butter for dipping can be made ahead and stored in the fridge for up to 1 week—just reheat gently before serving.
These balls keep their crispiness for about 30 minutes at room temperature, so serve them immediately after frying. For make-ahead prep, shape the dough balls and freeze them on a tray before frying—this prevents sticking and ensures even cooking. Once fried, store in an airtight container for up to 2 days, though they're best enjoyed fresh. Reheat in a 350°F oven for 5-7 minutes to restore crispiness. The honey mustard dip can be made 24 hours ahead and stored in the fridge.
Why You'll Love This Recipe
- Here’s what sold me: fry them once, store them in the fridge for days. Reheat in a skillet or oven, and they’re fresh again. My go-to for weeknight meals when I’m too tired to cook—just toss a few in a salad or melt them over toast.
- Five-Ingredient Magic: I swear by this—just cheese, flour, eggs, and herbs. That’s it. No fancy pantry items, no last-minute grocery runs. My lazy Sundays start with these because they’re the ultimate "I have nothing but basics" fix.
- Crispy-Creamy Obsession: The flour crust gets golden and shatteringly crisp while the goat cheese stays velvety inside. Honestly, the contrast is what makes it ridiculous—like biting into a buttery, herby hug. (Yes, even on a Tuesday night.)
- Party in a Bowl: These disappear at gatherings—appetizer, snack, or side, they’re always the first to go. I’ve served them at game nights, book club potlucks, and even as a "fancy" charcuterie add-on. Zero effort, maximum wow.
Step-by-step instructions for golden crispy goat cheese balls
Here's the method for achieving perfectly golden, crispy goat cheese balls with a herbed tang.
Prepare the Goat Cheese Mixture
Place the 8 oz goat cheese in a mixing bowl and let it sit at room temperature for 10 minutes if it's cold from the refrigerator. This ensures it's soft and pliable for shaping. Add the 0.25 cup fresh chives and 0.25 cup fresh dill, finely chopped, and mix until evenly distributed throughout the cheese.
In a small bowl, whisk together the 1 whole large egg, 1 tsp lemon zest, 0.5 tsp flaky sea salt, and 0.25 tsp black pepper. Slowly drizzle this mixture into the goat cheese while stirring gently with a spatula. The goal is to create a cohesive, spreadable dough without overworking it. If the mixture feels too dry, add 1 tablespoon of all-purpose flour at a time until it holds together when pressed between your fingers.
Shape and Coat the Goat Cheese Balls
Using a small cookie scoop or your hands, roll the mixture into 1-inch balls, making sure each one is uniform in size. Place them on a parchment-lined baking sheet and refrigerate for 20 minutes to firm up slightly. This step is crucial for maintaining their shape during frying.
In a shallow bowl, combine the 1 cup all-purpose flour and 0.5 cup panko breadcrumbs. Dredge each chilled goat cheese ball in the flour mixture, pressing gently to adhere the coating evenly. Transfer the coated balls to another parchment-lined sheet and refrigerate for an additional 15 minutes to ensure the coating stays in place.
Fry to Golden Perfection
Heat 2 cups vegetable oil in a deep skillet or Dutch oven over medium heat until it reaches 350°F. Use a kitchen thermometer to monitor the temperature—this is critical for achieving a crispy exterior without an oily interior. Once the oil is hot, carefully add the coated goat cheese balls in a single layer, being mindful not to overcrowd the pan.
Fry the balls for 2-3 minutes per side, or until they turn a deep golden brown and the coating is uniformly crispy. Use a slotted spoon to remove them from the oil and drain on a wire rack or paper towel-lined plate. The balls should be firm to the touch and maintain their shape, not collapsing under pressure.
Serve with Honey Mustard Dip
In a small saucepan, melt the 2 tbsp butter over low heat, then remove from heat and stir in the 2 tbsp honey. Let the mixture cool slightly until it thickens into a glossy, pourable consistency. This honey mustard dip complements the herbed tang of the goat cheese balls perfectly.
Serve the crispy goat cheese balls immediately while still warm, accompanied by the honey mustard dip. The contrast of the warm, golden exterior with the creamy, tangy interior makes each bite irresistible. For extra flair, sprinkle with an additional pinch of flaky sea salt and a few extra fresh dill leaves before serving.
Pro Tips For Making Fried Goat Cheese Balls
- CHILL THE GOAT CHEESE: Take the goat cheese out of the fridge 15 minutes before shaping—it’s less crumbly when warm. I learned this the hard way when my first batch turned to powder in my hands. Cold cheese means messy balls that won’t hold together.
- USE A SLOTTED SPOON: Drain the fried balls on a wire rack instead of paper towels—keeps them crispy. Paper towels steam them, and you’ll end up with soggy bottoms. A slotted spoon lets excess oil drip away while keeping the crust intact.
- DON’T OVERMIX THE BATTER: Stir the egg and flour just until combined—lumps are fine. Overworking it makes the coating gummy. I used to blend it smooth, and the texture suffered. Rough edges? That’s normal. Taste is what matters.
- FRIZZ IN BATCHES: Fry 2-3 balls at a time—crowding drops the oil temp and turns them greasy. Hot oil is your friend here. Skip the rush, or you’ll regret the soggy aftermath. (Yes, even if you’re impatient like me.)
Essential equipment for great fried goat cheese balls
Deep Fryer Essentials
For perfect results, a deep fryer like the Cuisinart 4-Quart is my go-to—it maintains consistent oil temperature and handles small batches beautifully. If you don’t own one, a heavy-bottomed Dutch oven (like All-Clad) works just as well.
The key is deep enough to submerge the balls completely without overflowing. Always use a kitchen thermometer to monitor oil temp—350°F is non-negotiable for crispiness without greasiness. 🌡️
Oil Selection Matters
Stick with vegetable or canola oil for their high smoke points—375°F+—which prevents burning while frying at 350°F. Avoid olive oil (it burns) or peanut oil (strong flavor). I recommend Mazola or Crisco for neutral taste and reliability.
Use 2 cups for this recipe, but filter and reuse oil up to 3 times if properly strained between batches. Keep a wire mesh strainer nearby for easy cleanup.
Coating Prep Tools
Two shallow bowls are essential: one for flour and one for panko breadcrumbs. I use Corelle stoneware bowls—they’re sturdy and easy to clean.
A small cookie scoop (like OXO Good Grips) helps create uniform 1-inch balls, while a fine-mesh sieve ensures your flour is sifted for a lighter coating. For extra crunch, toast your panko in a dry pan for 2 minutes before mixing—it amplifies the texture. 🍞
Temperature Control Gear
A digital instant-read thermometer (I swear by ThermoWorks Thermapen) is your best friend—it reads oil temp in seconds and prevents guesswork. For the dough, a small offset spatula helps shape balls without sticking, while parchment-lined baking sheets prevent spreading during chilling.
If you’re frying in batches, keep the cooked balls on a wire cooling rack to maintain crispiness—not a paper towel (it steams them).
Safety First
Never leave hot oil unattended—oven mitts and a long-handled slotted spoon (like OXO Good Grips) are must-haves for safe handling. Place a fire extinguisher nearby (or know how to smother flames with a lid).
For extra safety, use a timer to avoid overfrying—2-3 minutes per side is ideal. A small bowl of ice water nearby helps reset your thermometer between batches. 🔥
Optional Upgrades
For restaurant-quality results, invest in a food scale (like Escali Primo) to measure goat cheese precisely—8 oz makes all the difference. A mortar and pestle crushs fresh herbs finer than a knife, intensifying flavor.
For presentation, a dipping sauce station with mini ramekins (like IKEA 365+) keeps sauces neat. Store leftovers in an airtight container with a paper towel to absorb moisture and extend crispiness for 2 days.
Nutrition facts
Frequently asked questions
Can I make these goat cheese balls without frying?
For a lighter version, bake them at 375°F for 12-15 minutes on a parchment-lined tray until golden. Brush with melted butter halfway for extra crispiness. The texture will be softer than fried, but still delicious with the honey mustard dip.
Why did my goat cheese balls fall apart when frying?
This usually happens if the dough is too warm before frying or the oil isn't hot enough. Chill the shaped balls for 20 minutes before frying, and maintain 350°F oil temperature. If the mixture feels too soft, add 1 extra tablespoon of flour to help bind it better.
What's the best way to store leftover fried goat cheese balls?
Keep them in an airtight container with a paper towel to absorb moisture. They'll stay crispy for 2 days at room temperature. To reheat, warm in a 350°F oven for 5-7 minutes until golden again. For longer storage, freeze for up to 1 month—just fry from frozen for 1-2 extra minutes.
Can I use dried herbs instead of fresh?
Yes, but use only half the amount (so 1/8 tsp each of dried chives and dill). Fresh herbs provide better texture and brighter flavor, but dried will work in a pinch. For extra flavor, add 1/4 tsp garlic powder or 1/4 tsp onion powder to compensate.
What other dips pair well with these?
Beyond honey mustard, try marinara sauce, spicy aioli, or balsamic glaze. For a sweet option, mix 1 tbsp maple syrup with 1 tbsp Greek yogurt. The tangy goat cheese balances rich, sweet, or spicy dips perfectly.