
Main Courses
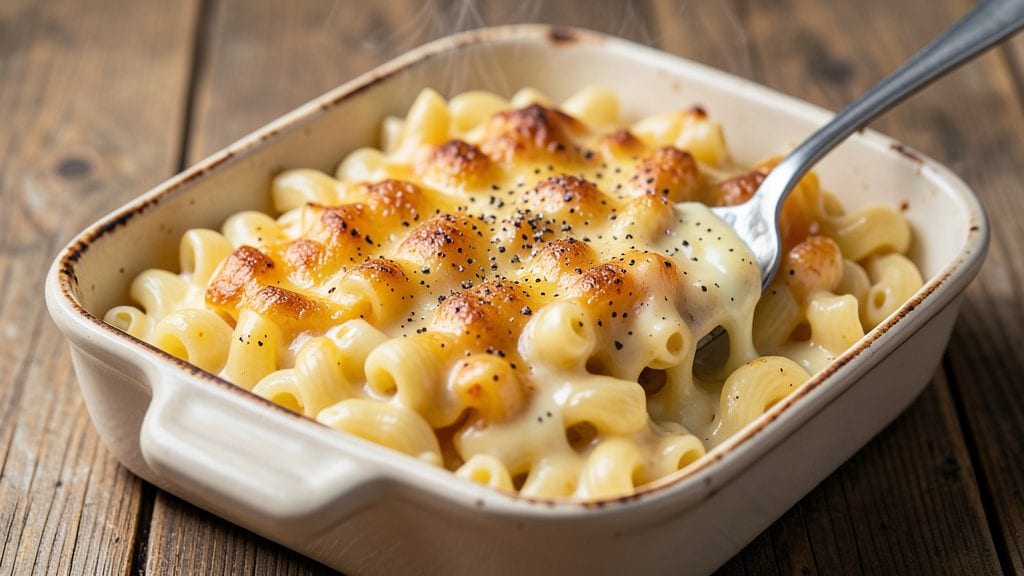
Grandma’s mac and cheese recipe brings back that childhood feeling of comfort and warmth in every bite. The crispy golden crust gives way to gooey, pull-apart cheese that clings to perfectly cooked noodles—just like she used to make.
This isn’t just a dish; it’s a memory waiting to be recreated in your kitchen with simple ingredients and a few timeless techniques.
The secret lies in the cheese sauce, where sharp cheddar and creamy milk blend into a velvety base that coats each noodle perfectly. A buttery roux forms the foundation, ensuring the sauce stays rich and smooth without separating.
For that signature crispy top, we’ll use a mix of breadcrumbs and melted butter, baked until golden brown—just like Grandma’s.
What you’ll end up with is a dish that’s impossible to resist: tender pasta bathed in creamy cheese, topped with a crackly crust that shatters at every bite. It’s the kind of mac and cheese that brings people to the table, whether it’s a weeknight dinner or a holiday gathering.
Ready to bring back those nostalgic flavors?
This recipe works just as well on the stovetop as it does in the oven, so you can adapt it to fit your schedule. The instructions are straightforward, but the results are anything but ordinary—every bite tastes like home. Let’s get started on making this classic dish your own.
Ingredients for grandma's mac n cheese
Simple pantry staples transform into Grandma's legendary mac and cheese with crispy magic.
| Ingredient | Amount | Notes |
|---|---|---|
| Elbow Macaroni 🍝 | 1 ½ lbs | Medium or fine elbow shape |
| Sharp Cheddar Cheese 🧀 | 3 cups | Aged 2+ years, freshly grated |
| Heavy Cream 🥛 | 1 cup | Full-fat for creaminess |
| Whole Milk 🥛 | 1 cup | Warm for smoother sauce |
| Unsalted Butter 🧈 | ½ cup | Cold, cubed for roux |
| All-Purpose Flour 🌾 | ¼ cup | For smooth roux base |
| Panko Breadcrumbs 🍞 | ½ cup | For crispy topping |
| Garlic Powder 🧄 | 1 tsp | Enhances cheesy flavor |
| Ground Black Pepper 🌶️ | ½ tsp | Freshly cracked preferred |
| Kosher Salt 🧂 | 1 ½ tsp | Adjust to taste |
| Extra-Virgin Olive Oil 🫒 | 2 tbsp | For buttery crispiness |
| Sharp White Pepper 🌶️ | ¼ tsp | For elegant finish |
The cheese is non-negotiable here. Sharp cheddar from Gouda Cheese Company or Cabot makes all the difference—it's aged 2+ years for that perfect tang. I always grab extra and grate it myself (pre-grated gets clumpy). For the pasta, Barilla or De Cecco are my go-tos—they cook perfectly without getting mushy. The breadcrumbs? Panko gives you that perfect crunch—don't use regular breadcrumbs, trust me. And that buttery roux? Use Land O'Lakes unsalted butter because it's consistently high-quality for this kind of cooking.
No sharp cheddar? Gruyère or aged Gouda work beautifully—just add a pinch of mustard powder to mimic that cheddar bite. Running low on heavy cream? Half-and-half works in a pinch, but the sauce won't be quite as rich. The garlic powder can be swapped for 1/4 tsp onion powder plus 1/4 tsp garlic powder if you're feeling fancy. For the crispy topping, crushed cornflakes are a great alternative if you're out of panko. And if you're worried about the roux breaking, remember: low and slow wins the race—don't rush the cooking process or you'll end up with lumps.
This reheats like a dream—honestly tastes better the next day once everything melds together. Keeps 4-5 days in the fridge, but I always make extra because it disappears so fast. For leftovers, cover tightly with foil to keep that crispy crust intact. Freezes beautifully for up to 3 months—just bake straight from frozen, adding 5-10 minutes to the baking time. Pro tip: Assemble it ahead and refrigerate overnight for even more flavor development.
Why You'll Love This Recipe
- No-Fuss Stovetop: I swear by this method—just boil the pasta, melt the butter, and stir in that sharp cheddar until it’s glorious. No baking required, no waiting for an oven. Honestly, it’s the kind of recipe that makes me feel like I actually cooked something, even when I didn’t.
- Melty Magic: That moment when the cheddar turns into a creamy, stretchy blanket over the pasta? Chef’s kiss. The heavy cream and whole milk make it rich but not heavy, and the sharp cheddar adds just enough bite to keep it interesting—not too sweet, not too bland.
- Leftovers for Days: This dish tastes even better the next day. I make a big batch on Sundays, and by Wednesday, it’s still the star of my lunch. The pasta holds up, the cheese gets even more flavorful, and honestly? It’s my go-to for lazy afternoons when I don’t want to think about cooking.
- Budget-Friendly Luxury: Sharp chedddar and butter might sound fancy, but this recipe stretches easily—double the batch, freeze half, and you’ve got a cheap, filling meal for another night. Plus, elbow macaroni is one of the most affordable pastas out there, so you’re getting restaurant-quality comfort without the price tag.
Step-by-step instructions for Grandma's mac and cheese
Here's how to recreate that perfect balance of crispy crust and gooey, pull-apart goodness.
Cook the Elbow Macaroni to Al Dente Perfection
Bring a large pot of water to a rolling boil. Add the 1.5 lbs elbow macaroni and 1.5 tsp kosher salt, stirring to prevent sticking. Cook until 1 minute before the package directions specify for al dente (about 11-12 minutes). This ensures the pasta finishes cooking in the oven with the sauce.
Drain the pasta, but don't rinse it—those starchy strands help the cheese sauce cling beautifully. Transfer the drained pasta to a large mixing bowl and set aside. The warm pasta will help the cheese melt more evenly later on.
Make the Ultra-Creamy Cheese Sauce
In a separate large pot, melt the 0.5 cup unsalted butter over medium heat. Once melted, whisk in the 0.25 cup all-purpose flour to form a roux. Cook for 1-2 minutes, stirring constantly, until the mixture turns a pale golden color and smells nutty.
Gradually whisk in the 1 cup whole milk and 1 cup heavy cream, letting each addition cook for 30 seconds before adding the next. This slow incorporation prevents lumps and creates a silky texture. Stir in the 3 cups sharp cheddar cheese, 1 tsp garlic powder, 0.5 tsp ground black pepper, and 0.25 tsp sharp white pepper until completely melted and smooth. The sauce should coat the back of a spoon and have a luxurious, velvety consistency.
Combine Pasta and Sauce for Maximum Gooeyness
Pour the hot cheese sauce over the warm elbow macaroni in the mixing bowl. Using a wooden spoon or rubber spatula, fold everything together until the pasta is completely coated and the sauce has fully integrated. The mixture should look creamy and inviting—this is where the magic happens.
Taste and adjust seasoning if needed. I usually add a pinch more kosher salt or black pepper at this stage. The sauce should be rich but not overwhelmingly salty. Transfer the pasta mixture to a greased 9x13-inch baking dish and spread it evenly into a single layer.
Create the Crispy Topping Layer
In a small bowl, mix together the 0.5 cup panko breadcrumbs, 2 tbsp extra-virgin olive oil, and 0.5 tsp ground black pepper. Sprinkle this mixture evenly over the top of the mac and cheese, pressing down gently with your fingers to help it adhere. The oil in the breadcrumbs will create that perfect golden-brown crust we're after.
For extra flavor, you can also sprinkle a little more sharp cheddar cheese on top if you like. The key is to distribute the topping evenly so every bite gets that satisfying crunch.
Bake Until Golden and Bubbly
Preheat your oven to 375°F. Place the baking dish on the middle rack and bake for 20-25 minutes until the top is deep golden brown and the edges are bubbling. The center should still look slightly underdone—this ensures the perfect pull-apart texture.
For the final touch, broil for 1-2 minutes at the very end to intensify the browning on top. Watch carefully to avoid burning. Once the top is beautifully crispy, remove from the oven and let it rest for 5 minutes before serving. This resting time allows the flavors to meld together and makes cutting through the crispy crust easier.
Pro Tips For Making Grandma'S Mac N Cheese
- Cook pasta al dente: DESCRIPTION: Grandma’s recipe depends on elbow macaroni that’s just firm to the bite—no mushy nonsense. Taste-test a piece at 60 seconds before the package’s suggested time, or you’ll end up with gluey noodles fighting for space in the cheese sauce. (Yes, even if you’re impatient like me.)
- Grate cheese aggressively: DESCRIPTION: Sharp cheddar loses its edge when shredded in the bag—it turns to powder. Use a box grater and shred it yourself, then toss it with a splash of milk to keep it from clumping. Trust me, the texture difference is night and day.
- Don’t rush the roux: DESCRIPTION: The butter-milk base needs time to thicken properly. Cook it on medium-low heat, stirring constantly, until it’s a smooth, pale gold—about 5-7 minutes. If you crank the heat, you’ll end up with a gritty, burnt mess that’ll ruin the whole dish.
- Layer the cheese: DESCRIPTION: Dump all the cheddar at once, and you’ll end up with a sad, greasy blob. Instead, add half the cheese to the sauce, stir until melted, then fold in the rest. This keeps the sauce creamy and prevents separation. (Your future self will thank you.)
Make-ahead tips for leftovers
Prep Ahead Strategy
Assemble the mac and cheese completely—pasta, sauce, and topping—then refrigerate it overnight. The flavors deepen and meld beautifully, creating a richer, more complex dish. I always do this when making it for a crowd because it tastes even better the next day. 💫
Freezer-Friendly Assembly
For long-term storage, assemble the dish in a 9x13-inch baking dish and cover tightly with airtight aluminum foil. Freeze for up to 3 months. When ready to serve, bake straight from frozen at 375°F for 30-35 minutes, adding 5-10 minutes extra for the crispy topping.
The texture stays creamy, just like fresh!
Make-Ahead Baking Schedule
Plan to bake the mac and cheese 30-60 minutes before serving for the best results. If you're short on time, assemble it in the morning and refrigerate until ready to bake. The cold dish will take 5-10 minutes longer to reach the perfect golden-brown crust. 🍽️
Portioning for Leftovers
Divide the baked mac and cheese into individual portions before refrigerating. Store in airtight containers with a sprinkle of extra cheese on top to prevent drying. Reheat covered at 350°F for 15-20 minutes, then broil for 2 minutes to restore the crispy texture.
Stovetop Make-Ahead Hack
If you prefer stovetop mac and cheese, cook the pasta and sauce as directed, then refrigerate in a sealed container. Reheat gently on the stove over low heat, stirring frequently, until warmed through. For extra richness, stir in 2 tbsp heavy cream while reheating to restore creaminess.
Holiday Party Prep
For gatherings, assemble the dish in individual ramekins or a large baking dish with parchment paper underneath for easy removal. Bake as usual, then cover with foil to keep warm. Serve family-style or let guests grab their own portions—everyone will love the crispy, gooey magic! 🎉
Nutrition facts
Frequently asked questions
Why does Grandma's mac and cheese need a roux?
The roux (butter + flour) is the secret to that ultra-creamy texture. It thickens the sauce properly and creates a velvety base that clings to every noodle. Skipping it often leads to a watery or grainy consistency. Think of it as the glue that holds everything together beautifully!
Can I use pre-shredded cheese?
While it's convenient, pre-shredded cheese contains anti-caking agents that can make your sauce grainy. For the smoothest texture, always grate your own sharp cheddar. If you must use pre-shredded, try a high-quality brand and sift it first to remove any additives. The flavor difference is worth the extra effort!
How do I fix a broken sauce?
If your sauce separates or gets lumpy, don't panic! Stir in 1 tablespoon cold butter or 1 tablespoon heavy cream and warm gently over low heat. For lumps, blend briefly with an immersion blender (if you have one) or press through a fine-mesh sieve. The key is patience—keep stirring until smooth!
What's the best way to reheat leftovers?
Cover with foil and warm at 350°F for 15-20 minutes, then broil for 2 minutes to restore that crispy top. For stovetop, reheat gently with a splash of milk or cream, stirring constantly. Never microwave—it makes the sauce rubbery and kills the crispy texture!
Can I make this vegetarian?
Replace the butter with olive oil or vegan butter, use dairy-free milk/cream, and swap cheddar for a sharp vegan cheese blend. For extra richness, add 2 tablespoons nutritional yeast to mimic the cheesy flavor. The crispy topping works perfectly with vegan breadcrumbs too!