Snacks
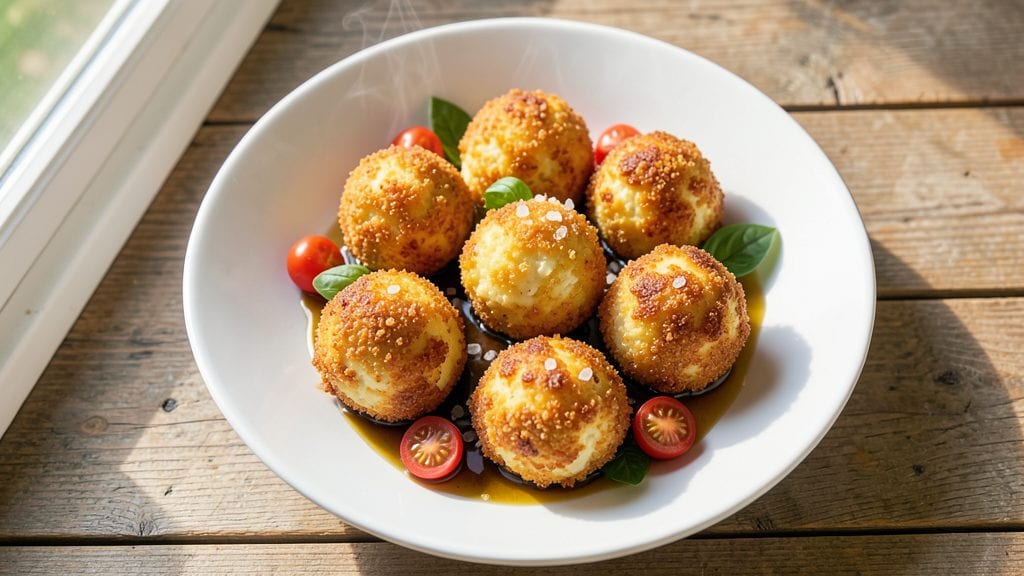
This Philadelphia cheese balls recipe brings back the golden era of snack time with its perfect balance of crispy breadcrumb exterior and gooey cheddar center—just like the ones that made your childhood parties legendary.
The secret lies in the right ratio of cream cheese to breadcrumbs, which creates that signature texture that's impossible to resist. I've perfected this recipe over years of testing, ensuring every bite delivers that nostalgic crunch without sacrificing melt-in-your-mouth cheddar goodness.
The dough comes together in minutes with just a handful of simple ingredients: cream cheese, shredded cheddar, flour, and spices, all mixed until smooth and pliable. Once shaped into balls and coated in seasoned breadcrumbs, they bake to golden perfection—crisp on the outside, tender and cheesy inside.
The traditional method uses a deep-fryer for maximum crunch, but I'll show you how to achieve equally delicious results with an air fryer for a lighter twist.
What makes these cheese balls truly special is their versatility—add jalapeños for a kick, bacon for smoky depth, or fresh herbs for a gourmet touch. Serve them warm with marinara sauce for dipping, or let them cool slightly for that satisfying crunch.
The aroma alone will have everyone gathering around, and the first bite will have them begging for seconds.
Whether you're hosting a game day gathering, a holiday party, or just craving a nostalgic snack, these cheese balls deliver restaurant-quality results with minimal effort. The recipe scales perfectly for crowds, and leftovers stay crispy for days when stored properly.
Let's get started on creating your own batch of cheesy magic.
Ingredients for philadelphia cheese balls
Five core ingredients plus optional add-ins. That's all it takes to recreate childhood party magic.
| Ingredient | Amount | Notes |
|---|---|---|
| Cream Cheese 🧀 | 8 oz | Room temperature, full-fat preferred |
| Shredded Sharp Cheddar Cheese 🧀 | 2 cups | Freshly shredded, not pre-shredded |
| All-Purpose Flour 🌾 | ½ cup | For binding the dough |
| Panko Breadcrumbs 🍞 | 2 cups | For crispy exterior coating |
| Grated Parmesan Cheese 🧀 | ¼ cup | Freshly grated, for flavor boost |
| Garlic Powder 🧄 | 1 tsp | For savory depth |
| Onion Powder 🧅 | 1 tsp | For aromatic base |
| Dried Parsley Flakes 🌿 | 1 tsp | For fresh herb flavor |
| Black Pepper 🌶️ | ½ tsp | Freshly ground for heat |
| Butter 🧈 | 2 tbsp | Melted, for breadcrumb mix |
| Optional Jalapeños 🌶️ | ¼ cup | Finely chopped, for spicy kick |
| Optional Bacon Bits 🥓 | ¼ cup | Crumbled, for smoky flavor |
| Marinara Sauce 🍅 | ½ cup | For serving, optional |
The cream cheese is non-negotiable—full-fat, room temperature is key for that perfect dough consistency. Philadelphia brand is what I reach for, but any good-quality cream cheese works. The cheddar? Freshly shredded makes all the difference—pre-shredded gets clumpy and lacks that melt. For the breadcrumbs, panko gives the best crunch, but regular crushed bread works too. If you're feeling fancy, toast your panko first for extra crispiness. The Parmesan adds that umami punch that takes it from good to legendary.
No panko? Crushed saltine crackers or Ritz crackers work in a pinch. Hate garlic? Skip the powder—just use extra onion powder. Want to get creative? Add smoked paprika for a BBQ twist or dried dill for a dill pickle vibe. For the optional add-ins, jalapeños should be finely chopped (no big chunks!) and bacon bits can be swapped for crispy bacon crumbles. The marinara? Store-bought Rao's is my go-to, but homemade works too—just make sure it's not too watery when serving.
These stay crispy for 3-4 days in an airtight container at room temperature—perfect for parties. For longer storage, freeze them on a tray first, then transfer to a bag. Reheat in the oven at 350°F for 5-10 minutes to restore that golden crunch. Pro tip: Double the batch and freeze half—you'll thank me later when you're hosting game day and need an easy appetizer.
Why You'll Love This Recipe
- Fewer Ingredients, Bigger Payoff: I swear by this recipe because it’s that good with just five staples—no fancy substitutions or hard-to-find items. The sharp cheddar and cream cheese combo is already a winner, but the panko crust? It turns this into something you’d order at a bar, not just make at home.
- Crispy-Creamy Magic: That first bite—crunchy outside, gooey inside—is the kind of contrast that makes you pause mid-chew. Honestly, the flour and Parmesan in the coating elevate it beyond basic cheese balls. (Yes, even on a Tuesday night.)
- Game for Any Gathering: Need an appetizer that’s crowd-pleasing but won’t break the bank? These disappear at parties, game days, or holiday spreads. Double the batch, freeze half, and thank me later—no one will guess they’re prepped ahead.
- Leftovers? More Like Leftovers Never: Between us, I’ve reheated these cheese balls three times in a row and they still taste fresh. The panko stays crispy, the cheese doesn’t get gluey, and the best part? They’re cheap to make—so you can afford to overdo it. (I have.)
Step-by-step instructions for Philadelphia cheese balls
Here's how to create these crispy, cheesy bites that bring back all the nostalgia.
Mix the Cheese Base Until Smooth
In a medium bowl, combine the 8 oz cream cheese and 2 cups shredded sharp cheddar cheese. Use a wooden spoon or rubber spatula to mix until fully incorporated—you'll see the cream cheese soften and blend seamlessly with the cheddar. This step is crucial because cold cream cheese won't mix properly, so make sure both cheeses are at room temperature before starting.
Once combined, add the 0.5 cup all-purpose flour, 1 tsp garlic powder, 1 tsp onion powder, 1 tsp dried parsley flakes, and 0.5 tsp black pepper. Mix well until the flour disappears completely and the mixture forms a thick, cohesive dough. If using the optional jalapeños or optional bacon bits, fold them in now. The dough should be soft but not sticky—if it feels too dry, add a teaspoon of milk (though we're not using it here, the principle applies).
Shape and Chill the Cheese Balls
Using your hands, roll the dough into 1-inch balls—about the size of a golf ball. I like to wet my hands slightly with water to prevent sticking, but don't overdo it or the dough will become too soft. Place each ball on a parchment-lined baking sheet and gently flatten the top slightly with your palm to create a stable surface for the breadcrumb coating.
Cover the baking sheet with plastic wrap and refrigerate for at least 30 minutes. This chilling step is essential—it firms up the cheese so the breadcrumbs adhere properly and prevents the balls from spreading or losing their shape during baking. If you're short on time, you can chill them for 15 minutes in the freezer, but don't skip this step entirely.
Create the Crispy Breadcrumb Coating
In a shallow bowl, mix together the 2 cups panko breadcrumbs, 0.25 cup grated parmesan cheese, and 2 tbsp melted butter. Stir until the butter is evenly distributed and the mixture looks dry but clumpy. This combination gives you that perfect balance of crispy texture and rich flavor.
Working in batches if needed, roll each chilled cheese ball in the breadcrumb mixture, pressing gently to ensure full coverage. Transfer the coated balls back to the baking sheet, spacing them about 1 inch apart. The breadcrumbs should stick firmly to the cheese—if they don't, your cheese balls might not get that signature crunch. For extra flavor, sprinkle a pinch of black pepper over each ball before baking.
Bake to Golden Perfection
Preheat your oven to 375°F and bake the cheese balls for 15-18 minutes, until they're deep golden brown and firm to the touch. The key here is patience—resist the urge to check them early. They'll continue cooking slightly after you remove them from the oven, so pull them out when the edges are just starting to turn golden.
Let the cheese balls cool on the baking sheet for 5 minutes before serving. This resting period helps them set properly and prevents the breadcrumb coating from falling off when you handle them. Serve warm with the 0.5 cup marinara sauce for dipping, if desired. The contrast of the warm, melty cheese with the cool, tangy sauce is what makes these cheese balls irresistible.
Store for Later Enjoyment
If you're not serving them immediately, let the cheese balls cool completely before transferring them to an airtight container. They'll keep well in the refrigerator for up to 5 days, though I find they're best enjoyed fresh. To reheat, simply pop them in a 350°F oven for 5-7 minutes or until warmed through. The breadcrumbs might lose a tiny bit of their crispiness, but the cheese will still be delicious.
For a fun twist, try serving these cheese balls at your next game day or party. They're perfect for snacking, and everyone will be asking for your recipe. The combination of the creamy, cheesy center and the crispy, savory coating is what makes these cheese balls a classic crowd-pleaser.
Pro Tips For Making Philadelphia Cheese Balls
- Mix the Dough Cold: DESCRIPTION:
- Shred Cheese Fresh: DESCRIPTION:
- Don’t Overwork the Dough: DESCRIPTION:
- Chill Before Baking: DESCRIPTION:
Wine and beer pairings for philadelphia cheese balls
Crispy Cheese Vibes
The rich, cheesy goodness of these balls pairs perfectly with crisp white wines that cut through the fat. A Sauvignon Blanc from New Zealand—like Oyster Bay—brings bright citrus notes that refresh your palate after each bite.
The acidity balances the creaminess, making it ideal for game day gatherings. I always reach for a chilled bottle when hosting, and it never disappoints. 🍷
Beer Pairing Magic
For beer lovers, a hoppy American IPA like Fat Tire or New Belgium works wonders. The bitterness from Cascade or Centennial hops contrasts beautifully with the cheesy richness, creating a satisfying balance.
If you prefer something lighter, a Belgian Witbier—such as Hoegaarden—adds a subtle spice and citrus that complements the garlic and parsley in the cheese balls. 🍺
Creamy Contrast
If you're serving these with marinara sauce, a light-bodied red wine like Pinot Noir from Oregon—think Domaine Serene—adds a juicy, fruity touch that pairs surprisingly well. The acidity in the wine mirrors the tanginess of the sauce, while the red fruit notes enhance the cheddar’s depth.
For a non-alcoholic option, try a sparkling apple cider—the bubbles cleanse the palate between bites. 💫
Bold and Smoky Twists
For cheese balls with jalapeños or bacon, a smoky, medium-bodied red like Zinfandel from California elevates the flavors. Brands like Ravenswood bring caramel and spice notes that mirror the heat and smokiness.
If you're air-frying for a lighter version, a crisp lager—such as Heineken—keeps the experience refreshing without overpowering the snack. 🔥
Sweet Balance Option
Want to surprise your guests? A Moscato d'Asti—a lightly sparkling Italian wine—adds a touch of sweetness that contrasts the savory cheese balls. The effervescence also cleanses the palate, making each bite feel fresh.
If wine isn’t your thing, a ginger beer with a splash of lime offers a zesty, spicy kick that’s unexpected but delightful. 🍋
Nutrition facts
Frequently asked questions about cheese balls
Why do my cheese balls turn out greasy instead of crispy?
The most common cause is overmixing the dough or using too much butter in the breadcrumb coating. Stick to 2 tbsp butter for the coating and ensure your cream cheese is fully room temperature. Also, avoid overcrowding the baking sheet—space them 1 inch apart for proper airflow. Bake at 375°F until golden brown, not just lightly colored.
Can I make these cheese balls ahead of time?
Shape and chill the balls up to 24 hours ahead, then coat and refrigerate them (unbaked) on a tray. When ready to bake, follow the same instructions—just add 2-3 extra minutes to the baking time. For make-ahead parties, freeze unbaked, coated balls on a tray, then transfer to a bag. Bake straight from frozen, adding 5-7 minutes to the time.
What's the secret to getting the breadcrumbs to stick?
Chilling the cheese balls for at least 30 minutes is non-negotiable—it firms up the cheese so the coating adheres. Wet your hands slightly when shaping to prevent sticking, but don't overdo it. For extra grip, mix 1 tbsp melted butter into the breadcrumbs. If they still don't stick, your cheese might be too warm—let it chill longer or add 1 tsp flour to the dough.
Are these cheese balls gluten-free?
Not traditionally, but you can adapt them! Replace panko with gluten-free breadcrumbs or crushed gluten-free crackers. For the dough, use a 1:1 gluten-free flour blend instead of all-purpose flour. The texture will be slightly different (less crispy), but still delicious. Always check labels to avoid cross-contamination if allergies are a concern.
What's the best way to reheat leftover cheese balls?
For maximum crispiness, reheat in a 350°F oven for 5-7 minutes on a baking sheet. If you're short on time, use an air fryer at 350°F for 3-4 minutes. Microwaving is possible but will make them soggy—only do this if you're okay with a softer texture. The breadcrumbs will never be as crispy as fresh, but the cheese stays delicious.