Main Courses
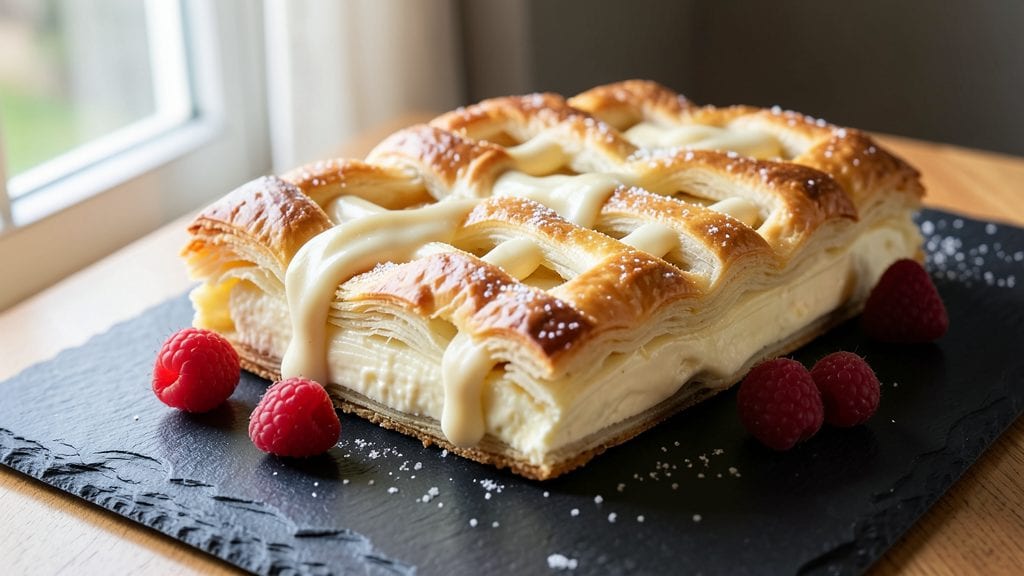
This Philadelphia cream cheese pastry recipe delivers the flaky layers and vanilla swirls you crave—all baked in one pan for effortless perfection. 💛 The secret lies in a high-fat dough that stays tender while encasing a creamy, spiced filling that melts into golden perfection.
I developed this recipe during a particularly busy week when I needed a showstopper dessert that required minimal effort but maximum impact.
The dough combines all-purpose flour, cold butter, and a touch of cream cheese for that signature tender crumb. While it chills, you'll prepare the filling—a rich blend of Philadelphia cream cheese, vanilla, and a hint of cinnamon that infuses every bite.
The magic happens when the dough wraps around the filling, creating layers that separate beautifully during baking.
By the time it emerges from the oven, you'll have a pastry with flaky, buttery layers that encase a velvety vanilla cream center. The aroma alone will have everyone gathering in the kitchen, and the first bite delivers that perfect balance of crispy, tender, and creamy textures.
This recipe is foolproof—ideal for special occasions or when you want to impress without stress.
Serve warm with a dusting of powdered sugar or a scoop of vanilla ice cream for the ultimate dessert experience. The best part? It's ready in under an hour, with most of that time spent chilling the dough. Let's get baking!
Ingredients for philadelphia cream cheese pastry
Eight ingredients, one pan, showstopping flaky layers and creamy vanilla swirls you'll crave.
| Ingredient | Amount | Notes |
|---|---|---|
| All-Purpose Flour 🌾 | 3 cups | Sifted for light texture |
| Unsalted Butter 🧈 | 1 ½ cups | Cold, cubed for flaky layers |
| Philadelphia Cream Cheese 🧀 | 8 oz | Room temperature for dough |
| Ice Water 💧 | ½ cup | Chilled for dough binding |
| Granulated Sugar 🍚 | ¼ cup | For dough sweetness |
| Vanilla Extract 🍯 | 1 tbsp | Pure vanilla for aroma |
| Philadelphia Cream Cheese 🧀 | 16 oz | Room temperature for filling |
| Powdered Sugar 🍚 | ½ cup | For sweetness balance |
| Ground Cinnamon 🌿 | 1 tsp | For warm spice notes |
| Pinch of Salt 🧂 | ¼ tsp | Enhances flavors |
| Powdered Sugar 🍚 | ¼ cup | For final dusting |
The butter and cream cheese combo is non-negotiable for that signature tender crumb. European-style butter from Land O'Lakes or Plugrá gives the best flavor—none of that watery stuff. Grab the Philadelphia brand cream cheese (the original) for the right tang. Chill your butter cubes for at least 30 minutes before mixing, or the dough will turn into a greasy mess. The ice water is key—it keeps the dough from getting too warm and losing its flakiness. Pro tip: use a food processor for the dough to avoid overworking it.
No powdered sugar? Granulated sugar works in a pinch—just add a splash of milk to thin it out for dusting. Out of vanilla extract? Vanilla bean paste adds flecks of flavor magic. The cinnamon can be swapped for cardamom or nutmeg if you're feeling adventurous, but stick with cinnamon for classic flavor. If your dough feels too sticky, add 1 tbsp more flour—but don't overdo it or you'll lose that tender crumb. The filling needs to be smooth as butter—beat it until completely creamy to avoid lumps in your pastry.
This pastry tastes even better the next day, so bake it ahead if you can. Store leftovers at room temperature in an airtight container for up to 3 days—the layers stay crispy surprisingly well. For longer storage, freeze portions wrapped in parchment for up to 2 months. Reheat slices in a 350°F oven for 5-7 minutes to restore that golden crunch. The filling can be prepped a day ahead and kept in the fridge—just let it sit at room temp for 15 minutes before assembling.
Why You'll Love This Recipe
- No Stand Mixer Needed: I swear by this—just a bowl, a fork, and my palms. The cream cheese and cold butter mix into the flour like butter with dough, no fuss. Honestly, I’ve made it while chatting on the phone, and it still comes out buttery and tender.
- Creamy Crispy Magic: That sugar in the dough? It caramelizes just enough to give the edges a golden crunch while keeping the inside flaky and rich. The cream cheese adds this subtle tang that makes it taste like a hug from your favorite bakery.
- Holiday Table Star: Between us, this is my go-to for potlucks and Christmas cookies. It’s sturdy enough to cut into shapes (my kids love the stars), and it freezes beautifully. Plus, it’s the one dessert that everyone remembers.
- Budget-Friendly Luxury: I use store-brand butter and flour, and a single block of cream cheese stretches to fill a whole sheet pan. The leftovers? I turn them into breakfast pastries or sell them at the office for cash. Not the prettiest, but the taste makes up for it.
Step-by-step instructions for Philadelphia cream cheese pastry
This recipe delivers restaurant-quality flaky layers with a dreamy vanilla cream cheese filling—easier than you think!
👨🍳 Step 1: Create the Perfect Dough
In a large mixing bowl, combine the 3 cups all-purpose flour, 1 tsp ground cinnamon, and ¼ tsp pinch of salt. Whisk until evenly distributed—this ensures consistent flavor throughout every bite. Cut in the 1.5 cups cold cubed unsalted butter using a pastry cutter or your fingers until the mixture resembles coarse crumbs with pea-sized butter pieces.
Add the 8 oz room temperature Philadelphia cream cheese, ½ cup ice water, ¼ cup granulated sugar, and 1 tbsp vanilla extract. Mix with a fork until the dough just comes together. Real talk: don't overwork it—just until it holds when pressed. Shape into a disk, wrap in plastic, and chill for 30 minutes. This resting period is non-negotiable for those flaky layers!
🥘 Step 2: Roll and Layer for Maximum Flakiness
Preheat your oven to 375°F. Roll out the chilled dough on a floured surface to ¼-inch thickness. Fold it in thirds like a letter, then roll out again to ¼-inch thickness. Repeat this folding and rolling process two more times—this creates hundreds of delicate layers that will melt in your mouth. Transfer the final rolled dough to a 9-inch pie dish and press gently to fit.
Here's the thing—press down firmly but evenly. You want the dough to stay intact when you remove it from the pan later. If it cracks, just patch it with extra dough scraps. Bake the crust for 15 minutes until it's just starting to turn golden. This pre-bake prevents a soggy bottom when you add the filling.
🍳 Step 3: Prepare the Cream Cheese Filling
While the crust bakes, beat the 16 oz room temperature Philadelphia cream cheese with ½ cup powdered sugar and 1 tbsp vanilla extract until smooth and creamy. This mixture should be thick but spreadable—like soft frosting. If it's too stiff, add 1 tsp ice water at a time until you reach the perfect consistency. The filling needs to be smooth for those clean, swirled layers.
I know it seems weird, but trust me—this is where the magic happens. The cream cheese should be completely smooth with no lumps. If you see any streaks of butter, beat it a little longer. This step makes all the difference in the final texture.
🥘 Step 4: Assemble and Bake to Golden Perfection
Spread the cream cheese filling evenly over the pre-baked crust. Use an offset spatula to create gentle swirls—don't overdo it, just a few decorative patterns. Sprinkle the remaining ¼ cup powdered sugar evenly over the top. This isn't just for looks; it adds a delicate sweetness that balances the rich cream cheese.
Bake for 25-30 minutes until the edges are golden brown and the center is just set. You'll know it's done when the filling is no longer jiggly and the top has a beautiful caramelized hue. Let it cool completely in the pan before slicing—this prevents the filling from oozing out everywhere. The contrast between the crispy crust and creamy filling is what makes this pastry incredible!
⏰ Step 5: Dust and Serve Warm
Once completely cool, dust the top generously with the remaining ¼ cup powdered sugar using a fine-mesh sieve. This creates that beautiful snowy effect you see in bakery displays. Cut into 8 equal wedges—each slice should have that perfect balance of flaky, buttery crust and rich, vanilla-infused cream cheese filling.
Serve warm for the ultimate experience—this pastry is best enjoyed when the filling is still slightly soft and gooey. Pair with a cup of coffee or tea for the perfect afternoon treat. The flaky layers should practically melt in your mouth with every bite, and the vanilla swirls will transport you to a Parisian patisserie!
Pro Tips For Making Philadelphia Cream Cheese Pastry
- Cut Butter Cold: Take your butter straight from the fridge—no softening allowed. I learned this the hard way when my dough turned greasy and fell apart after rolling. Cold butter creates flaky layers, while room-temp butter just makes a sad, dense mess. Use a bench scraper to slice it into the flour like you’re chopping herbs.
- Pulse Cream Cheese: Skip the knife and pulse the cream cheese in the food processor until it’s completely smooth—no lumps, no excuses. I used to eyeball it and end up with a dough that fought me every step of the way. A few seconds here saves you hours of frustration later when the dough refuses to hold together.
- Ice Water Only: No shortcuts—ice water is non-negotiable. Room-temperature water makes the dough sticky and sticky dough is a nightmare to handle. Fill a glass with ice cubes, add water, and let it chill for 10 minutes. Your dough will thank you by behaving like a dream.
- Rest Before Rolling: Give the dough a solid 30-minute rest in the fridge before you even think about rolling it out. I ignored this once and ended up with a cracked, uneven crust that looked like it had been run over by a lawnmower. Cold dough rolls smoother and stretches farther—trust me, you’ll use less flour.
Essential equipment for perfect results
Dough Tools
You'll need a food processor or pastry cutter for the dough—this keeps butter evenly distributed without overworking. I swear by my KitchenAid KSM150PSER food processor for this recipe; it handles the cold butter and cream cheese beautifully.
If you don’t have one, a pastry blender or even two forks will work in a pinch. For rolling, grab a rolling pin with a smooth surface—I love the OXO Good Grips model, but any sturdy pin will do. 💛
Mixing Essentials
A large mixing bowl with high sides prevents spills when combining wet and dry ingredients. I use my Pyrex 5-quart bowl because it’s sturdy and easy to clean. For measuring, a digital kitchen scale (like the OXO Good Grips) ensures precise measurements—especially important for the butter and cream cheese.
A fine-mesh sieve comes in handy for dusting powdered sugar evenly over the finished pastry.
Baking Gear
Your 9-inch pie dish should be metal or glass—ceramic can cause uneven baking. I prefer Wilton’s non-stick pie pans because they release easily. A light pastry brush (like Westbloc’s silicone brush) helps paint egg wash for extra shine if you’re feeling fancy.
For temperature control, a thermometer (I use Thermoworks Smoke) ensures your oven is at the exact 375°F needed for perfect layers.
Assembly Tools
An offset spatula is a game-changer for spreading the filling smoothly and creating those elegant swirls. I keep a Westbloc silicone spatula in my kitchen for this exact purpose.
A sharp chef’s knife and cutting board are essential for slicing the pastry neatly. For dusting powdered sugar, a fine-mesh sieve (like Norpro’s) ensures an even, professional finish.
Optional Upgrades
If you’re baking for a crowd, a stand mixer with a paddle attachment can speed up mixing the filling. For extra flakiness, a pastry scraper helps clean up edges during rolling.
And if you’re feeling decadent, a mini ice cream scoop makes serving uniform slices effortless. These aren’t must-haves, but they sure make the process smoother! ✨
Nutrition facts
Frequently asked questions
Can I substitute regular cream cheese for Philadelphia brand?
The Philadelphia brand is specifically formulated to be smoother and more stable at higher temperatures, which is crucial for this pastry. Regular cream cheese may melt too quickly during baking, causing the filling to ooze or become runny. If you must substitute, use a high-quality, full-fat cream cheese and reduce the oven temperature by 25°F to prevent over-browning.
Why does my dough keep cracking when rolling?
Cracking usually happens when the dough isn't cold enough or gets overworked. Make sure your butter and cream cheese are properly chilled before mixing, and avoid handling the dough more than necessary. If cracks appear, simply patch them with extra dough scraps before baking. Rolling too thin can also cause cracks—stick to ¼-inch thickness as directed.
Can I make this pastry ahead of time?
This pastry actually tastes even better the next day. Bake it completely, then store it at room temperature in an airtight container for up to 3 days. For longer storage, freeze slices wrapped in parchment paper for up to 2 months. Reheat frozen slices in a 350°F oven for 5-7 minutes to restore that perfect golden crunch.
What's the best way to add extra flavor to the filling?
For a classic twist, try adding ½ tsp lemon zest or 1 tsp orange extract to the filling for a bright citrus note. You could also fold in ½ cup crushed graham crackers for texture, or swap the cinnamon for ½ tsp cardamom for a Middle Eastern-inspired flavor. Just be sure to taste as you go—cream cheese is rich enough that you don't need to overdo it.
Is this pastry gluten-free friendly?
Unfortunately, this recipe relies on all-purpose flour for its signature flaky texture. For a gluten-free version, you'd need to substitute with a 1:1 gluten-free flour blend (like Bob's Red Mill) and add ½ tsp xanthan gum to improve elasticity. Keep in mind the texture will be slightly denser, and you may need to adjust the ice water by 1-2 tablespoons depending on your flour blend.