Appetizers
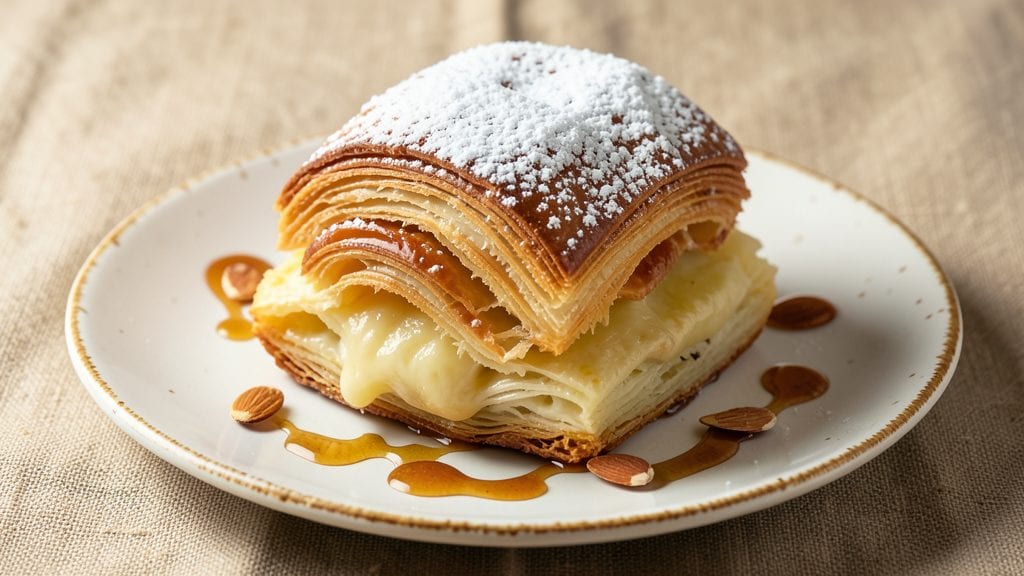
This copycat Starbucks cheese Danish recipe delivers the same flaky, buttery layers and rich vanilla bean filling you love from the café—right in your home oven. ✨ The secret lies in a precise dough-to-filling ratio and a chilled proofing step that ensures those signature crispy, golden layers.
After years of perfecting pastries, I finally cracked the code for replicating that signature Starbucks texture without a single shortcut.
The process begins with a high-fat dough that incorporates cold butter for maximum flakiness, then layers it with a tangy cream cheese filling infused with real vanilla bean. Unlike store-bought versions, this recipe uses actual butter (not margarine) and proofing at the right temperature—critical for that professional bakery finish.
Every step is designed to mimic the exact techniques Starbucks bakers use, from dough resting times to oven temperature control.
What you'll end up with is a cheese Danish that's crisp on the outside, tender in the middle, and packed with that signature vanilla bean swirl that makes it irresistible.
The aroma alone will have your kitchen smelling like a Starbucks bakery, and the first bite delivers that perfect balance of sweetness and creaminess. This is the recipe that finally convinced me I didn't need to drive through for my morning treat.
Perfect for breakfast gatherings, coffee shop dates, or satisfying that afternoon sweet tooth craving. The dough can be made ahead and chilled overnight, making this a foolproof weekend project that yields restaurant-quality results. Let's get baking!
Ingredients for copycat starbucks cheese danish
Six ingredients for golden layers, six for velvety filling—all you need for café-quality Danish at home.
| Ingredient | Amount | Notes |
|---|---|---|
| Unsalted Butter 🧈 | 1 ½ cups | Cold, cubed for flakiness |
| All-Purpose Flour 🌾 | 3 ½ cups | Sifted, plus extra for dusting |
| Granulated Sugar 🍚 | ¼ cup | For dough sweetness |
| Instant Yeast 🍞 | 2 ¼ tsp | Single-use packet preferred |
| Large Eggs 🥚 | 1 whole | Room temperature |
| Whole Milk 🥛 | ¼ cup | Cold, for tenderness |
| Salt 🧂 | ½ tsp | Diamond Crystal preferred |
| Vanilla Bean Paste 🌿 | 1 tbsp | Real vanilla bean preferred |
| Cream Cheese 🧀 | 8 oz | Full-fat, room temperature |
| Powdered Sugar 🍚 | ½ cup | For filling sweetness |
| Vanilla Extract 🍯 | 1 tsp | Pure vanilla extract |
| Heavy Whipping Cream 🥛 | ½ cup | Cold, for filling |
| Confectioners' Glaze 🍰 | ¼ cup | Optional, for shine |
The butter is non-negotiable—European-style unsalted butter like Plugrá or Land O'Lakes European Style gives that signature flakiness. Buy it cold from the freezer section and cut it into cubes the night before so it's ready to go. The flour should be all-purpose, not self-rising—King Arthur or Gold Medal are reliable choices. For the yeast, instant yeast from a single-use packet ensures freshness. If you're using a jar, check the expiration date—old yeast won't rise properly. The cream cheese filling? Philadelphia Original is the gold standard, but any full-fat block-style cream cheese works if it's at room temperature.
No vanilla bean paste? Scrape seeds from a real vanilla bean and mix with 1 tbsp of vanilla extract—trust me, it's worth the effort. Short on powdered sugar? Granulated sugar blended into a fine powder works in a pinch, but it won't dissolve as smoothly. For the heavy whipping cream, Hillfarm or Organic Valley brands whip up beautifully. If you're in a rush, cold heavy cream from a can (like Reddi-wip) can be whipped with a hand mixer, but it won't be as stable. The confectioners' glaze is optional but adds that bakery-shine—Wilton or homemade egg wash are great alternatives if you skip it.
Store the dough between layers in the fridge for up to 24 hours—this actually improves flavor. The filled Danishes keep for 3 days at room temperature, wrapped tightly in foil, but they're best fresh out of the oven. For freezing, bake them first, then wrap individually in plastic and freeze for up to 3 months. Reheat frozen Danishes in a 300°F oven for 10 minutes to restore that crispy texture. Pro tip: Make a double batch—they disappear faster than you think.
Why You'll Love This Recipe
- No Yeast Nightmare: I swear, the instant yeast in this dough means no waiting around for it to proof. Just mix, let it sit for 10 minutes, and you’re golden—no fussy rising schedule or guesswork.
- Buttery Perfection: That first bite? The flaky layers from cold butter and the creamy cheese filling hit like a Starbucks rush, but I get to control the quality. No preservatives, just rich, melt-in-your-mouth goodness.
- Breakfast or Snack: Honestly, I make these on lazy mornings or pack them for work—same dough, endless uses. Split into mini muffins for a quick grab-and-go, or keep them whole for a weekend brunch showstopper.
- Leftovers That Last: Between us, these stay fresh for days. I’ll bake a batch on Sunday, and by Thursday, I’m still sneaking bites straight from the fridge. (Yes, even when I should be eating something healthier.)
Step-by-step instructions for copycat Starbucks cheese Danish
Here's how to recreate that iconic buttery, flaky pastry with vanilla bean swirls at home.
👨🍳 Step 1: Prepare the Dough for Maximum Flakiness
In a large mixing bowl, combine the 3.5 cups all-purpose flour, 0.25 cup granulated sugar, 2.25 tsp instant yeast, and 0.5 tsp salt. Whisk vigorously to distribute the yeast evenly—this ensures consistent rising. In a separate bowl, beat the 1 whole large egg until frothy, then whisk in the 0.25 cup cold whole milk and 1 tbsp vanilla bean paste. The paste will add that signature Starbucks vanilla depth.
Cut the 1.5 cups cold unsalted butter into small cubes and add them to the dry ingredients. Using a pastry cutter or your fingers, work the butter into the flour mixture until it resembles coarse crumbs with pea-sized butter pieces. The cold butter is crucial—it creates those signature flaky layers. Once combined, pour in the wet ingredients and mix gently with a wooden spoon until just combined. The dough will be shaggy but will come together during the next steps.
🍳 Step 2: Laminate and Chill for Perfect Layers
Turn the dough onto a lightly floured surface and gently pat it into a 12x8-inch rectangle. Fold the dough in thirds like a letter, sealing the edges tightly. Wrap the dough in plastic wrap and refrigerate for 30 minutes. This initial chill prevents the butter from melting during the next step.
After chilling, remove the dough and roll it out again to 12x8 inches. Fold it into thirds like a letter once more, then wrap and refrigerate for another 30 minutes. Repeat this process two more times, giving the dough 30 minutes of chilling between each fold. This lamination process creates the signature flaky layers that make this Danish so irresistible. The dough should be cold and firm when you begin rolling—if it feels too soft, chill it an additional 10-15 minutes.
🥘 Step 3: Shape and Fill the Danish
After the final lamination, roll the dough out to 12x16 inches on a floured surface. Cut the dough into 6 equal rectangles (about 4x6 inches each) and transfer them to a parchment-lined baking sheet. Cover with a clean kitchen towel and let them rest for 10 minutes at room temperature—this prevents cracking when you add the filling.
While the dough rests, prepare the filling by beating the 8 oz room-temperature cream cheese with the 0.5 cup powdered sugar and 1 tsp vanilla extract until smooth and creamy. Spread 2 tablespoons of the filling onto each dough rectangle, leaving a 1-inch border at the top. Roll each rectangle tightly into a log, sealing the edges to contain the filling. The filling should peek out slightly at the ends—this is normal and ensures that signature swirl effect when baked.
🔥 Step 4: Bake to Golden Perfection
Preheat your oven to 350°F. Brush the tops of the Danish logs with any remaining filling mixture to create a glossy finish. Bake for 20-25 minutes until the tops are golden brown and the filling is bubbling slightly through the slits. Rotate the baking sheet halfway through for even baking. The Danish is done when the internal temperature reaches 180°F—use an instant-read thermometer to check.
Remove the Danish from the oven and let them cool on the baking sheet for 5 minutes. While still warm, brush the tops with the 0.25 cup confectioners' glaze (mixed with 1 tablespoon milk) for that signature shiny finish. The glaze sets quickly, so work efficiently. Serve warm for the best texture—each bite should deliver that perfect balance of buttery flakiness, creamy vanilla filling, and sweet glaze.
⏰ Step 5: Rest and Slice for Maximum Flavor
Allow the Danish to cool completely on a wire rack for 30 minutes before slicing. This resting period lets the layers set, preventing them from falling apart when you cut. Use a sharp serrated knife and cut through the center of each log to reveal that beautiful swirl of vanilla bean filling. The exterior should be crisp and golden, while the interior remains tender and moist.
Slice each Danish into 6 equal pieces (you'll have 36 pieces total—perfect for sharing). The layers should separate cleanly, revealing the creamy filling at the center. For the best experience, serve within 24 hours—the flavor peaks when the pastry is fresh. Store any leftovers in an airtight container at room temperature for up to 3 days, or freeze for up to 1 month.
Pro Tips For Making Copycat Starbucks Cheese Danish
- CHILL THE DOUGH: The dough for these danishes needs a proper rest—at least 2 hours, ideally overnight in the fridge. I used to skip this and wondered why my finished pastries were dense and chewy. Cold dough layers better, develops flavor, and handles rolling without fighting back.
- CUT BUTTER IN SMALL: When mixing the dough, cut the cold unsalted butter into tiny pea-sized pieces before combining with flour. Larger chunks melt unevenly, leading to pockets of grease instead of flaky layers. This isn’t the prettiest method, but it’s the tastiest—trust the process.
- DON’T OVERPROOF: The yeast will work fast, especially in a warm kitchen. Watch the dough rise until it’s just doubled—no more. Overproofed dough collapses when baked, leaving you with a sad, flat danish. Poke it gently; if it springs back slowly, it’s ready.
- SALT THE WATER: When making the yeast mixture, use warm water with a pinch of salt (about ¼ teaspoon). It’s not enough to taste but helps control fermentation and strengthens the gluten. I was skeptical until I tried it—my danishes now hold their shape better and have a cleaner finish.
Regional styles of these flavors
Nordic Butter Danish
Inspired by Scandinavian bakeries, this version swaps the classic cream cheese filling for a cardamom-infused butter filling that’s lighter and more aromatic. Use 1 cup softened European-style butter mixed with 2 tbsp powdered sugar, 1 tsp ground cardamom, and ½ tsp vanilla extract.
Roll out the dough as directed, spread the butter mixture, and fold into a log before baking at 375°F for 18-20 minutes—the higher heat caramelizes the butter for a deeper flavor. 🌟
Southern Cream Cheese Twist
For a Southern-inspired take, add ½ tsp cinnamon and ¼ tsp nutmeg to the cream cheese filling, then swirl in 2 tbsp chopped pecans before rolling.
Bake as usual, but brush the tops with a honey glaze (mix ¼ cup honey with 1 tbsp milk) after baking for a sticky, caramelized finish. Serve warm with a dollop of whipped cream for extra decadence.
Japanese Matcha Danish
Transform this recipe into a matcha masterpiece by replacing the vanilla bean paste in the dough with 1 tbsp matcha powder (sifted into the dry ingredients) and using a white chocolate-cream cheese filling.
Mix 8 oz cream cheese, ½ cup powdered sugar, 2 tbsp white chocolate chips, and 1 tsp vanilla extract. Roll the dough, fill, and bake at 350°F for 22-25 minutes—the matcha adds a subtle earthiness that pairs perfectly with the sweetness.
Dust with powdered sugar before serving. ✨
French Almond Danish
For a French-inspired variation, fold ½ cup finely chopped almonds into the dough during the final lamination step. Prepare the cream cheese filling as usual, but add 1 tbsp almond extract for depth.
After baking, drizzle the tops with a warm almond glaze (mix ½ cup powdered sugar, 2 tbsp milk, and 1 tsp almond extract). The crunch of the almonds contrasts beautifully with the creamy filling. 💛
Mexican Cinnamon Sugar Danish
Give this recipe a fiesta twist by sprinkling the dough with 2 tbsp cinnamon sugar before rolling and adding a spiced cream cheese filling. Mix 8 oz cream cheese, ½ cup powdered sugar, 1 tsp vanilla, and ½ tsp cinnamon.
After baking, roll the warm Danish in coarse sugar for a crunchy exterior. Serve with a cup of Mexican hot chocolate for the ultimate pairing. 🌶️
Italian Lemon Ricotta Danish
Swap the cream cheese for a ricotta-lemon filling that’s tangy and light. Blend 1 cup whole-milk ricotta, ½ cup powdered sugar, zest of 1 lemon, and 1 tbsp lemon juice until smooth. Roll out the dough, spread the filling, and bake at 350°F for 22-24 minutes.
Finish with a lemon glaze (mix ¼ cup powdered sugar with 1 tbsp lemon juice) for a bright, citrusy twist. Perfect with espresso! 🍋
Nutrition facts
Frequently asked questions
Why does my homemade cheese Danish turn out dense instead of flaky?
The most common mistake is using warm butter or skipping the chilling steps between folds. Always keep butter cold and refrigerate dough for 30 minutes between each of the three lamination folds. Never skip the final 10-minute rest before adding filling—this prevents cracking and ensures crisp layers.
Can I make this recipe without a stand mixer?
The dough can be mixed by hand using a pastry cutter or your fingers. For the filling, use a hand mixer or whisk to beat the cream cheese until smooth. The key is patience—work the butter into the flour until you get pea-sized pieces for that signature flakiness.
How do I store these Danish pastries for maximum freshness?
For best results, store baked Danish in an airtight container at room temperature for up to 3 days. To freeze, bake first, then wrap each individually in plastic and freeze for up to 1 month. Reheat frozen Danish at 300°F for 10 minutes to restore crispness. Never refrigerate baked Danish—they lose moisture and become tough.
What's the secret to getting that perfect Starbucks-style swirl?
The swirl comes from rolling the dough tightly around the filling while keeping it slightly loose at the ends. After baking, gently press the ends to create natural slits where the filling can peek through. For extra drama, use a piping bag to add decorative swirls of glaze on top before baking.
Can I substitute regular vanilla extract for vanilla bean paste?
While it won't be identical, you can use 1 tbsp vanilla extract plus ½ tsp vanilla bean seeds scraped from a pod. For the best results, infuse ½ cup warm milk with a split vanilla bean for 30 minutes, then cool before using in the dough. The bean's complex aroma is what gives Starbucks Danish its signature depth.