Desserts
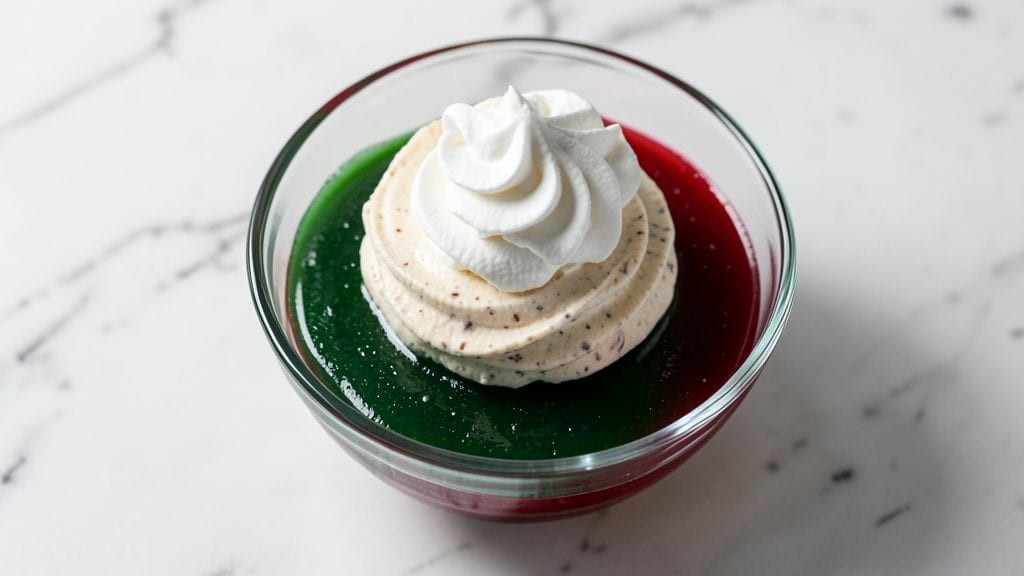
This no-bake Jello cream cheese Cool Whip dessert delivers restaurant-quality layers in under 30 minutes—no oven, no stress, just creamy, tangy perfection. The secret lies in precise layering: gelatin sets firm enough to hold the weight of Cool Whip and cream cheese filling without collapsing.
I perfected this recipe after testing countless ratios, and the result is a dessert that looks impressive but requires only basic kitchen tools.
The foundation is a smooth, vibrant gelatin base—whether you prefer cherry, lemon, or lime—followed by a silky cream cheese layer that adds rich tanginess. Cool Whip ties it all together, creating that signature cloud-like texture between each layer.
Chilling times are critical here: too short, and the gelatin won’t set properly; too long, and the Cool Whip may weep. I’ve included exact timing to ensure every layer holds its shape.
What you’ll end up with is a cool, creamy dessert that’s light yet satisfying—each bite delivers the bright tang of gelatin, the velvety smoothness of cream cheese, and the airy sweetness of Cool Whip. The best part?
No baking required, no waiting for an oven to heat up, and no risk of burning. This dessert is perfect for potlucks, last-minute gatherings, or when you crave something sweet without the effort.
Optional garnishes like whipped cream, fresh berries, or a sprinkle of crushed cookies elevate it further, but the base recipe is foolproof as-is. Ready to create dessert magic in minutes? Let’s get started.
Ingredients for jello cream cheese cool whip
Eight simple ingredients transform into restaurant-quality layered dessert magic—no oven needed.
| Ingredient | Amount | Notes |
|---|---|---|
| Unflavored Gelatin 🧃 | 2 tbsp | Powdered, high-quality preferred |
| Hot Water 💧 | 1 cup | Boiled, not scalding |
| Jello Flavor Powder 🍒 | 1 box | Cherry, lemon, or lime (8 oz) |
| Cool Whip 🍦 | 2 cups | Thawed, full-fat preferred |
| Cream Cheese 🧀 | 8 oz | Full-fat, room temperature |
| Heavy Whipping Cream 🥛 | ½ cup | Cold, for cream cheese filling |
| Powdered Sugar 🍚 | 2 tbsp | For cream cheese filling |
| Vanilla Extract 🌿 | ½ tsp | Pure, for cream cheese filling |
| Whipped Cream 🍦 | 1 cup | Optional garnish, homemade or store-bought |
| Fresh Berries 🍓 | ½ cup | Optional garnish, sliced |
| Crushed Cookies 🍪 | ¼ cup | Optional garnish, like Oreos or graham crackers |
| Clear Glass Dessert Dishes 🍽️ | 2 pieces | 8x4-inch or similar, for layering |
The gelatin is non-negotiable for structure—Knox unflavored is my go-to, but any high-quality powder works. For the Jello flavor, Kraft or Smucker’s boxes are reliable, but grab the organic or sugar-free versions if you prefer. The key is dissolving the gelatin completely in hot water before mixing with the Jello powder—no lumps, or your layers will be grainy. I always double-check the box for exact water measurements since ratios vary by brand. For the Cool Whip, full-fat is worth the splurge here—it holds its shape better between layers.
No Cool Whip? Whipped cream or Greek yogurt can stand in, though the texture won’t be as light. Running low on cream cheese? Cottage cheese blended smooth works in a pinch, but it’ll be tangier. The heavy whipping cream in the filling can be swapped for half-and-half***, but it won’t whip as stiff. For the Jello flavor, homemade fruit puree (like cherry or lemon) can replace the powder—just dissolve it in the hot water first. And if you’re avoiding sugar, sugar-free Jello and powdered erythritol keep the sweetness without the calories. The crushed cookies? Any kind works, but I like Oreos for chocolate or graham crackers for vanilla***.
Prep the gelatin mixture first—it needs 15 minutes to set before adding the next layer. Keep the cream cheese filling cold until ready to use; it’ll soften too much if left out. The entire dessert needs 4-6 hours in the fridge to fully set, but the longer it chills, the firmer it gets. For make-ahead magic, assemble it the night before—it’s even better the next day. To serve, run a knife around the edges and pop it out of the dish for that restaurant-worthy presentation. Garnishes like whipped cream or berries add color but aren’t necessary—this dessert is foolproof as-is.
Why You'll Love This Recipe
- No-Fuss Layers: I swear by this recipe when I need dessert in 10 minutes flat. Just bloom the gelatin in hot water, stir in the Jello powder, fold in Cool Whip and softened cream cheese—no mixer required. The texture? Silky-smooth swirls that look way fancier than they are.
- Creamy Tang Twist: That cream cheese keeps this from being just another wobbly Jello. It adds a rich, velvety bite that cuts through the sweetness—like a grown-up version of those childhood snacks. Honestly, I make this for myself more than anyone else.
- Party Trifle Hack: Layer it in cups for a no-bake dessert that’s perfect for potlucks or kids’ birthdays. The gelatin sets up like a sturdy base, so you can stack flavors (think strawberry or lemon Jello) without collapse. My nephew calls it "fancy pudding," and I don’t correct him.
- Zero-Waste Leftovers: The best part? This keeps for days in the fridge, and slices like a dream. I’ve sent jars to work for coworkers’ birthdays—no reheating, no mess. Between us, it’s also way cheaper than store-bought trifles.
Step-by-step instructions for jello cream cheese Cool Whip dessert
This layered dessert comes together faster than you can say "no oven required."
Prepare the Jello Layers
In a medium microwave-safe bowl, sprinkle the 2 tbsp unflavored gelatin evenly over the 1 cup hot water. Let it sit for 5 minutes - you'll see the gelatin begin to dissolve completely on its own. This step is crucial because blooming the gelatin properly prevents grainy texture later.
Once fully dissolved, stir in the contents of the 1 box jello flavor powder until completely smooth. Divide this mixture evenly between the 2 pieces clear glass dessert dishes. Refrigerate for at least 2 hours or until completely set - the edges should pull away cleanly from the glass when gently shaken.
Create the Cream Cheese Filling
In a chilled mixing bowl, beat the 8 oz cream cheese with an electric mixer until completely smooth. Add the 0.5 cup heavy whipping cream, 2 tbsp powdered sugar, and 0.5 tsp vanilla extract, mixing on medium speed until fully incorporated and lightened in color. This should take about 2 minutes - you're looking for a thick but spreadable consistency.
Spread this mixture evenly over the set jello layers in each dish. The cream cheese should cover the jello completely but not overfill - you want about ¼ inch of filling above the jello. Return to the refrigerator while you prepare the Cool Whip layer.
Assemble the Cool Whip Topping
Using a spatula, spread the 2 cups Cool Whip evenly over the cream cheese layer in each dish. Press down gently to create a smooth surface - this helps prevent the Cool Whip from sliding off when serving. The contrast between the vibrant jello, creamy filling, and fluffy Cool Whip creates that perfect layered effect.
For an extra touch, pipe or dollop the 1 cup whipped cream on top of each dish. This adds both visual appeal and a lighter texture contrast. The whipped cream should be piped in small swirls or dollops rather than spread flat - this creates more surface area for the optional toppings.
Add Optional Garnishes and Chill
Sprinkle the 0.5 cup fresh berries and 0.25 cup crushed cookies evenly over each dessert. The berries add a fresh, vibrant pop of color while the crushed cookies provide a delightful crunch contrast. For best presentation, arrange the berries in a circular pattern around the edge of each dish.
Return the desserts to the refrigerator for at least 1 hour before serving. This final chilling ensures all layers hold their shape and temperatures are consistent. When ready to serve, run a knife around the edges of each dish to help release the clean layers. Each bite should deliver the perfect sequence of jello, cream cheese, and Cool Whip textures.
Pro Tips For Making Jello Cream Cheese Cool Whip
- Bloom the gelatin right: I learned this the hard way—dumping dry gelatin into hot water makes it clump like glue. Instead, sprinkle it over cold water first, let it sit 5 minutes to bloom, then pour in the hot water. The texture stays silky, not grainy, and your layers won’t separate later.
- Use room-temperature cream cheese: Cold cream cheese lumps up when mixed with Cool Whip, and your dessert turns into a sad, streaky mess. Take it out 30 minutes before mixing—it blends smoother and holds its shape in the fridge. (Yes, even if you’re impatient like me.)
- Fold, don’t stir: The moment you stir Cool Whip and cream cheese together, you’re deflating it. Use a spatula to gently fold in just 1/3 of the whipped cream first, then mix in the rest. This keeps it light and fluffy instead of dense.
- Chill the jello mix first: Pouring warm jello over cream cheese makes it melt into a blob. Let your jello mixture cool to room temp (about 10 minutes) before layering—it’ll set faster and stay crisp against the creamy base. (Your future self will thank you.)
Perfect pairings for this jello cream cheese cool whip
Fruit Toppings
Fresh fruit transforms this dessert from simple to showstopping. I always use strawberries or raspberries because their bright colors contrast beautifully with the jello’s hue. Slice ½ cup mixed berries into thin rounds and arrange them in a circular pattern around the edge of each dish.
For extra flair, drizzle with warm apricot jam or raspberry coulis—just 1 tbsp per dish—to create a glossy finish. 🍓
Cookie Crumbles
Crushed cookies add texture and a nostalgic crunch that balances the creamy layers. My go-to is Oreos for chocolate lovers or graham crackers for a vanilla note. Pulse ½ cup cookies in a food processor until you get fine crumbs, then sprinkle evenly over the Cool Whip.
For a festive touch, press mini chocolate chips into the crumbles before chilling. This step is optional but elevates the dessert to bakery-quality.
Whipped Cream Swirls
Homemade whipped cream takes this dessert to the next level. Whip 1 cup heavy whipping cream with 1 tbsp powdered sugar and ½ tsp vanilla extract until soft peaks form. Use a piping bag fitted with a star tip to create delicate swirls on top of the Cool Whip.
For a modern twist, add edible gold leaf or a sprinkle of crushed pistachios to the whipped cream before piping. The contrast of the airy cream against the dense layers is pure magic. 🍦
Chocolate Drizzle
A simple chocolate drizzle ties all the layers together with rich, velvety depth. Melt 4 oz dark or semi-sweet chocolate in 2 tbsp heavy cream over a double boiler, then let cool slightly. Drizzle in zigzag patterns over the whipped cream or directly onto the Cool Whip.
For a peppermint twist, add crushed candy canes to the drizzle while it’s still warm. This step works especially well with cherry or lime jello flavors.
Caramel Sauce
Store-bought caramel sauce adds a sweet, buttery contrast that complements the tangy cream cheese. Warm ½ cup caramel sauce (like Smucker’s or Trader Joe’s) in the microwave for 10-15 seconds, then drizzle in a wavy pattern over the entire dessert.
For a gourmet touch, top with toasted pecans or sea salt flakes. The salt enhances the caramel’s sweetness and cuts through the richness of the Cool Whip. 💛
Citrus Zest
Bright citrus zest adds a refreshing finish that cuts through the dessert’s richness. Use a microplane to zest 1 lemon or lime, then sprinkle lightly over the whipped cream or Cool Whip. For a bold flavor, mix the zest with 1 tsp powdered sugar*.
The citrus pairs perfectly with lemon or lime jello flavors, creating a cohesive, tangy experience. This garnish is especially effective in warmer months when you crave something light and refreshing.
Nutrition facts
Frequently asked questions
Can I make this dessert without Cool Whip?
Swap the Cool Whip for 2 cups whipped cream or 1½ cups Greek yogurt. Both work well, though whipped cream will give a lighter texture. For a dairy-free option, use coconut whipped cream. Just chill it longer to help it set better between layers.
Why did my gelatin layer collapse when I added the cream cheese?
This usually happens if the gelatin wasn't fully set or if the cream cheese layer was too thick. Always let the gelatin chill for at least 2 hours. Also, make sure your cream cheese mixture is cold and spread evenly—no more than ¼ inch thick. If it still collapses, try a firmer gelatin flavor like cherry or lime.
How long can I store this dessert?
Assembled desserts keep well in the fridge for 3-4 days. For longer storage, freeze the layers separately (without Cool Whip) for up to 1 month. Thaw overnight in the fridge before reassembling. The Cool Whip layer is best added fresh after thawing to maintain its fluffy texture.
Can I use sugar-free ingredients?
Yes! Replace regular Jello with sugar-free Jello powder. For the cream cheese filling, use sugar-free powdered sweetener***. The Cool Whip layer will still be sweet, but the overall dessert will have fewer calories. Just note that sugar-free versions may have a slightly different texture—especially the gelatin.
What's the best way to serve this dessert?
For a restaurant-style presentation, run a knife around the edges of the dish before serving to release clean layers. Use a long spoon to scoop out portions, keeping the layers intact. Serve with a dollop of extra whipped cream or a sprinkle of crushed cookies on the side for guests to add their own garnish.