Appetizers
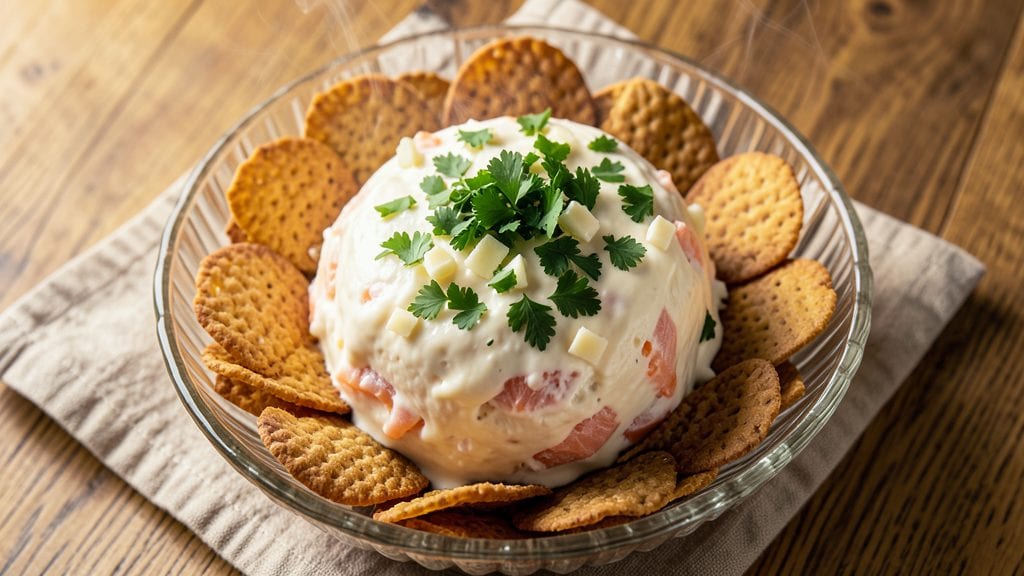
This canned salmon cheese ball recipe transforms simple pantry staples into a pescatarian-friendly appetizer that delivers flaky, herby perfection with every bite.
The secret lies in blending canned salmon with cream cheese and sharp cheddar, then encasing it in a crispy herb crust that holds together beautifully—no fancy equipment required.
I developed this recipe after realizing how versatile canned salmon could be in savory dishes, and it’s become a staple at my gatherings.
The best part? It takes just 15 minutes to mix and shape, then 1 hour chilling time to set—ideal for parties or game day.
The salmon adds a delicate, briny depth that pairs perfectly with the creamy cheese base, while the herb crust (made with crushed crackers and fresh parsley) provides satisfying texture. This isn’t your average cheese ball; it’s a restaurant-worthy appetizer that’s surprisingly easy to make.
What you’ll end up with is a golden, crunchy cheese ball that’s creamy inside, flaky from the salmon, and packed with herbaceous flavor. The crust stays crisp even after slicing, making it perfect for serving with crackers, veggies, or as a standalone snack.
It’s the kind of dish that disappears quickly—guaranteed to impress without the fuss.
Serve at room temperature for the best texture, or store in the fridge for up to 5 days—it reheats beautifully in the oven if you prefer it warm. Whether you’re hosting or just craving something savory, this recipe delivers professional results with minimal effort. Let’s get started!
Ingredients for canned salmon cheese ball
Pantry staples meet ocean magic—this flaky, herby cheese ball is game-changing for pescatarian gatherings.
| Ingredient | Amount | Notes |
|---|---|---|
| Canned Salmon (with skin and bones) 🐟 | 2 cans | Drained, flaked thoroughly |
| Cream Cheese (full-fat) 🧀 | 8 oz | Room temperature for blending |
| Sharp White Cheddar Cheese 🧀 | 8 oz | Shredded, not pre-shredded |
| Fresh Parsley 🌿 | ½ cup | Finely chopped, stems removed |
| Dried Dill Weed 🌿 | 1 tsp | For herby depth |
| Rice Crackers 🍞 | 2 cups | Crushed into fine crumbs |
| Extra-Virgin Olive Oil 🫒 | 1 tbsp | For binding crust |
| Lemon Juice 🍋 | 1 tbsp | Freshly squeezed |
| Garlic Powder 🧄 | ½ tsp | For subtle depth |
| Diamond Crystal Kosher Salt 🧂 | ½ tsp | Adjust to taste |
| Fresh Lemon Zest 🍋 | 1 tsp | Brightens flavor |
| Parmesan Cheese (grated) 🧀 | ¼ cup | For umami boost |
| Fresh Chives 🌿 | 2 tbsp | Finely chopped, for garnish |
The salmon is the star here—look for high-quality canned salmon with skin and bones for maximum flavor and texture. Wild Planet or Vital Choice brands are my go-tos, but any reputable brand works. Drain it well and flake it thoroughly, using a fork to break up the flesh completely. The cream cheese should be full-fat and room temperature—this makes blending silky smooth. For the cheddar, sharp white cheddar is non-negotiable; it adds that tangy brightness that cuts through the richness. If you can't find fresh parsley, dried parsley works at half the amount, but fresh is absolutely essential for that vibrant herbaceous punch.
No rice crackers? Crushed Ritz crackers or saltines work in a pinch—they add that same satisfying crunch. Short on fresh herbs? Dried dill and parsley can substitute, but reduce to one-third the amount. The lemon juice is crucial—it brightens the whole dish, so don't skip it. If you're feeling fancy, add a pinch of smoked paprika to the crust for a subtle smoky note. For extra flakiness, I sometimes mix in finely crushed potato chips (about 1/4 cup) into the crust—trust me, it's a game-changer. The Parmesan adds that umami depth, so don't skimp on the good stuff.
This cheese ball needs at least 1 hour in the fridge to set properly, but it's worth it—it holds together beautifully and tastes even better the next day. Store it in an airtight container with parchment paper between layers to prevent sticking. It keeps for 5 days in the fridge or 3 months in the freezer. To reheat, pop it in the oven at 300°F for 10-15 minutes—it warms through beautifully while keeping that crispy crust. For serving, I always garnish with fresh chives and a sprinkle of extra Parmesan right before slicing—it makes all the difference.
Why You'll Love This Recipe
- I’ll be real: canned salmon is cheap, and this recipe uses the whole can—no waste. The leftovers? Just as good the next day, whether I’m snacking on them cold or tossing them into a quick salad. Plus, it’s the kind of thing that turns a sad fridge into a "we’re having dinner" moment.
- Five-Ingredient Magic: I swear, this is the kind of recipe where you look at the list and think, "Wait, that’s it?" The canned salmon’s flaky texture and those little bones? They melt right into the cream cheese and cheddar, giving it this unexpected depth without extra effort.
- Dill-Parsley Bomb: Honestly, the fresh parsley and dried dill make this taste like a fancy appetizer—even though it’s basically a bowl of cheese. That bright, herby finish cuts through the richness, and the sharp cheddar? It’s the secret weapon that makes it taste way more gourmet than it should.
- Party in a Bowl: Between us, this is my go-to for game day, book club, or just when I want to feed people without slaving away. Roll it into balls, stick it on a platter, and suddenly you’ve got a crowd-pleaser that’s actually easy to serve. (Yes, even on a Tuesday night.)
Step-by-step instructions for canned salmon cheese ball
Transform humble canned salmon into an irresistible cheese ball with a flaky, herby crust that will disappear in minutes.
Prepare the Salmon Mixture
Drain the 2 cans of canned salmon thoroughly, then flake the fish completely using your fingers or a fork. I like to press the salmon through a fork to remove any skin and bones that might remain—this ensures a perfectly smooth texture. Transfer the flaked salmon to a large mixing bowl.
Add the 8 ounces of room-temperature cream cheese and 8 ounces of shredded sharp white cheddar cheese to the bowl. Mix these ingredients together using a sturdy spatula or your hands until fully combined. The mixture should be creamy and uniform, with no visible lumps. This is the foundation of your cheese ball, so take your time to ensure everything is well incorporated.
Build Flavor with Herbs and Seasonings
In a small bowl, whisk together the 1 tablespoon of lemon juice, 1 tablespoon of extra-virgin olive oil, 0.5 teaspoon of garlic powder, 0.5 teaspoon of diamond crystal kosher salt, and 1 teaspoon of fresh lemon zest. This bright, aromatic blend is what transforms this cheese ball from ordinary to extraordinary.
Pour the herb mixture over the salmon and cheese combination, then gently fold everything together. Add the 0.5 cup of finely chopped fresh parsley and 1 teaspoon of dried dill weed, mixing until evenly distributed. The parsley adds freshness while the dill deepens the herby notes. Taste the mixture and adjust the salt if needed—this is your chance to perfect the flavor before shaping.
Create the Crunchy Herb Crust
In a food processor, pulse the 2 cups of rice crackers until they form fine crumbs. Transfer these crumbs to a separate bowl and mix in the 0.25 cup of grated parmesan cheese. This combination creates a perfect textural contrast—the creamy salmon mixture paired with a crispy, savory crust.
Divide the salmon mixture into 4 equal portions (about 1 cup each) and roll them into balls. I like to use my hands for this, pressing gently to ensure the balls are compact. This makes them easier to handle and ensures even cooking when you bake them later.
Assemble and Chill for Stability
Place one of the salmon balls on a parchment-lined baking sheet. Press the rice cracker and parmesan mixture firmly around the sides of the ball, creating a thick, even crust about 0.5 inches wide. Repeat with the remaining salmon balls, pressing the crust firmly to ensure it adheres well.
Once all four cheese balls are assembled, transfer them to an airtight container and refrigerate for at least 2 hours. This chilling time is crucial—it allows the flavors to meld and the crust to set properly. The longer you chill, the more stable the crust will be when you serve it. I often make these ahead of time and let them chill overnight for maximum flavor development.
Garnish and Serve with Fresh Herbs
Before serving, remove the cheese balls from the refrigerator and let them sit at room temperature for 10-15 minutes. This makes them easier to handle and enhances the flaky texture of the crust. Using a small bowl, sprinkle the 2 tablespoons of finely chopped fresh chives evenly over the top of each cheese ball.
Serve immediately with toothpicks for easy handling. The contrast of the creamy, flaky salmon filling with the crispy herb crust creates a texture and flavor experience that's simply irresistible. Each bite delivers that perfect balance of rich, herby, and slightly tangy notes that make this cheese ball unforgettable.
Pro Tips For Making Canned Salmon Cheese Ball
- Drain & Pat Dry: DESCRIPTION: Canned salmon holds way more water than you think. After draining, press it between paper towels—this prevents your cheese ball from turning into a sad, soupy mess. I learned this the hard way when my first batch fell apart in the bowl.
- Pulse, Don’t Blend: DESCRIPTION: Use a food processor to pulse the salmon and cheeses, not blend into oblivion. You want texture, not a paste—think chunky, not smooth. Stop when it looks like wet oatmeal, not glue.
- Chill Before Shaping: DESCRIPTION: Let the mixture sit in the fridge for 10–15 minutes after mixing. Cold ingredients bind better, so your cheese ball holds shape instead of oozing everywhere. (Yes, even if you’re impatient like me.)
- Toast the Dill: DESCRIPTION: Warm dried dill in a dry pan for 30 seconds before adding it to the mix. The aroma deepens instantly—no more bland, dusty flavor. Skip this, and you’ll wonder why your cheese ball tastes like nothing.
Wine and beer pairings for canned salmon cheese ball
Crisp White Wine
For this herby, briny cheese ball, I recommend a dry Riesling or Sauvignon Blanc—both wines complement the lemon zest and fresh herbs beautifully.
A chilled German Riesling with its crisp acidity and citrus notes mirrors the lemon in the recipe, while a New Zealand Sauvignon Blanc adds a zesty, grassy complexity that pairs perfectly with the salmon and parsley. Serve at 45-48°F for the best balance of brightness and refreshment. 🍷
Light Lager Beer
A crisp lager like Peroni or Heineken works wonders with this dish. The clean, slightly malty profile of these beers cuts through the richness of the cheese while enhancing the herby notes from the parsley and dill.
For a local favorite, try a Belgian witbier—its coriander and citrus undertones provide a delightful contrast to the salmon’s brininess. Serve at 40-45°F to keep it refreshing. 🍺
Sparkling Wine
If you're feeling festive, a dry sparkling wine like Prosecco or Champagne elevates the experience. The effervescence cleanses your palate between bites, while the acidity in Prosecco or Brut Champagne enhances the lemon and garlic flavors in the cheese ball.
I love pairing this with a Veuve Clicquot Brut—its toasty brioche notes add an unexpected depth that complements the salmon’s flakiness. 🥂
Herbal Gin Cocktail
For a boozy twist, serve this cheese ball with a gin-based cocktail like a Tom Collins or Gin Fizz. The botanical notes in gin—like juniper, coriander, and citrus—echo the herbs in the recipe, creating a harmonious flavor bridge.
A classic Beefeater Gin with a splash of lemon juice and soda water works perfectly. Garnish with a lemon twist for an extra pop of brightness. 🍸
Non-Alcoholic Pairings
Don’t have alcohol? No problem! A sparkling water with lemon or ginger beer like Feather’s adds effervescence and zing. For something richer, try a cucumber-mint infused water—the cool, refreshing notes balance the richness of the cheese ball.
A cold hibiscus iced tea also works beautifully, especially during warmer months. 💧
Nutrition facts
Frequently asked questions
Can I use canned salmon without skin and bones?
The recipe calls for salmon with skin and bones to maximize flavor and texture, but you can use boneless if needed. Simply drain thoroughly and flake extra fine to avoid any gritty texture. The flavor will be slightly milder, so consider adding an extra ½ teaspoon of dried dill or lemon zest to compensate.
How do I prevent the crust from falling off?
Press the cracker mixture firmly around the cheese ball and chill for at least 2 hours (overnight is best). For extra stability, dip the sides of the ball in a little melted butter or olive oil before adding the crust. Avoid overmixing the filling—keep it just combined for a cohesive texture.
What are the best ways to serve this cheese ball?
Slice into wedges with a sharp knife and serve with toothpicks for easy handling. Pair with cucumber slices, endive leaves, or water crackers. For a gourmet touch, drizzle with a lemon-dill aioli or serve with a side of smoked salmon for a luxe appetizer spread.
Can I make this cheese ball ahead of time?
Assemble the cheese balls up to 5 days in advance and store in an airtight container. The flavors deepen over time, and the crust stays crisp when sliced fresh. For longer storage, freeze for up to 3 months—thaw overnight in the fridge before serving.
Why does my cheese ball taste bland?
Check your seasonings—especially the lemon zest and salt. The salmon itself can be mild, so boost flavor with an extra 1 teaspoon of lemon juice or ½ teaspoon of garlic powder. Fresh herbs (parsley/chives) make a bigger difference than dried, so use fresh whenever possible. Taste as you mix!